

Here's how to.........
Start by painting it with white gesso, then paint it with white acrylic paint.
When dry I add on some TH tissue tape to strengthen the hinged lid and to add decoration.
Rip a piece of patterned paper - I used a piece from a book of sheet music.
Stamp background stamps randomly in acrylic paint - I used a Ranger paint dabber in pearl then colour with distress inks. When dry rub the stamped images with a very slightly damp cloth to remove the ink and reveal the image.
Next coat with a crackle medium -mine was from a local craft shop.When dry paint with a top coat of your choice.
Rub in distress ink with a piece of cut and dry foam to age the colour and highlight the cracks.
Paint on a thin coat of Claudine Hellmuths multi matte medium - the distress ink will lift but settles in the cracks of the paint.
Glue on a chipboard shape to the lid and cover with scrunched up tissue paper stuck down with the matte medium. When dry I highlighted it with distress ink.
Add on more tissue tape - I randomly added it to corners and on the back of the lid to give the impression the box had been repaired, then inked with vintage photo DI to age it.
For the top I chose a selection of random elements I have collected and started playing around with how I like them placed.
The girl is stamped on to a piece of vellum and stuck down by the objects around her and the optical lens.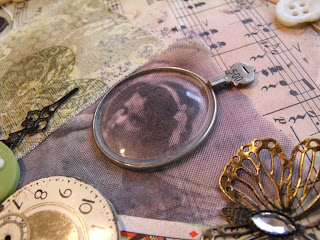 The piece of canvas was created with the faux batik technique I used HERE.

When you are happy with your arrangement glue the items down with the matte medium - because it dries clear it doesn't matter how messy you are - but you won't be able to ink again as it will resist.
Smear on some Distress stickles to highlight areas as much or as little as you like - I love its subtle aged shimmer.
Once I was happy with the top I started stamping around the sides and using TH distress embossing powders on some of the images to add a little bit of texture.
Again I added embellishments - mainly buttons, some mosaic pieces, a couple of tags from clothes (got to love River Islands mini masterpieces :D), lace and a scrap of the Batiked canvas I had cut off.


Then its time for the inside :D
It was already painted white and I crackled the inside of the lid at the same time as the rest of the box.
The sections were just spritzed with a combo of Cosmic Shimmer mists and edged with the tissue tape - this doesn't stick too well so needs coating with the matte medium to hold it down.
Hugs'n'snogs
Julie xx
When dry I add on some TH tissue tape to strengthen the hinged lid and to add decoration.
Rip a piece of patterned paper - I used a piece from a book of sheet music.
Stamp background stamps randomly in acrylic paint - I used a Ranger paint dabber in pearl then colour with distress inks. When dry rub the stamped images with a very slightly damp cloth to remove the ink and reveal the image.
Next coat with a crackle medium -mine was from a local craft shop.When dry paint with a top coat of your choice.
Rub in distress ink with a piece of cut and dry foam to age the colour and highlight the cracks.
Paint on a thin coat of Claudine Hellmuths multi matte medium - the distress ink will lift but settles in the cracks of the paint.
Glue on a chipboard shape to the lid and cover with scrunched up tissue paper stuck down with the matte medium. When dry I highlighted it with distress ink.
Add on more tissue tape - I randomly added it to corners and on the back of the lid to give the impression the box had been repaired, then inked with vintage photo DI to age it.
For the top I chose a selection of random elements I have collected and started playing around with how I like them placed.

The girl is stamped on to a piece of vellum and stuck down by the objects around her and the optical lens.
 The piece of canvas was created with the faux batik technique I used HERE.
When you are happy with your arrangement glue the items down with the matte medium - because it dries clear it doesn't matter how messy you are - but you won't be able to ink again as it will resist.
Smear on some Distress stickles to highlight areas as much or as little as you like - I love its subtle aged shimmer.

Once I was happy with the top I started stamping around the sides and using TH distress embossing powders on some of the images to add a little bit of texture.
Again I added embellishments - mainly buttons, some mosaic pieces, a couple of tags from clothes (got to love River Islands mini masterpieces :D), lace and a scrap of the Batiked canvas I had cut off.


Then its time for the inside :D

It was already painted white and I crackled the inside of the lid at the same time as the rest of the box.
The sections were just spritzed with a combo of Cosmic Shimmer mists and edged with the tissue tape - this doesn't stick too well so needs coating with the matte medium to hold it down.
I decorated mine to house my blending foam on the cards I shared with you On Saturday but you could yours for anything you want!!
The cards I have cut are 6.5x6.5 Cm's so if its smaller than that it should fit :D
The cards I have cut are 6.5x6.5 Cm's so if its smaller than that it should fit :D
- What about your ideaology bits and pieces?? some of those are quite hard to store in traditional boxes.
- Or if you have a lot of small stamps you could index them - or even store them in there - the Prima minis would just and no more fit if you cut the strip of gems off and trim the bottom.
- Or index your ideas that you just never seem to get around to trying, but then can't remember what you wanted to do when you find time??
- Or make a memory box?
- You could cut cards to fit and store ribbons or lace.
- If your a scrapbooker or card maker you could print or draw design sketches you want to use at a later date.
- They aren't quite tall enough for stickles or alcohol inks but the lid could easily be removed if you wanted open top storage.
You want one now don't you LOL :D
This was created for HAPPY DAZE and SCROLLS WORK STAMPS and nearly all of the items used are available from Moira.
Moira's next Facebook challenge is starts today and the theme is "in a Vintage style...." so hopefully this project will inspire you to dig out all those fabby embellies we all like to hoard and stick them on a project :D
Or perhaps you have some amazing stamps???
Moira stocks the fabulous Scrolls Work stamps and they have many stunning vintage images :D
It doesn't have to be a big project like this one, it can be a card or even a tag but make sure you upload to the Facebook page HERE for the chance of winning a £15 voucher :D
Hugs'n'snogs
Julie xx


Lovely box Julie...you are getting far too organised LOL
ReplyDeleteToni xx
I am so impressed by people who can do the distress look, I have tried and failed. It is such a gorgeous end result, you must be very pleased with it.
ReplyDeleteIt turned out fantastic :D
ReplyDeleteWhat a fantastic project. LOVE the optical frame and all the yummy embellishments. There is so much to see..... a n absolute treasure box! Sue x
ReplyDeleteAbsolutely gorgeous Julie, and you're right, I want one!
ReplyDeleteThis beautiful, looks like a labour of love.
ReplyDeleteGreat box. It's fantastic.
ReplyDeleteGorgeous box, love this!
ReplyDeleteThat's stunning Julie, really fab, love it.
ReplyDeleteC
xx
like the grunge effect..very nice
ReplyDeleteomg. I totally love this project. fabulous.
ReplyDeleteLove your box and so much detail I love all the embellies on the top but I have to say it's a great job all round
ReplyDeletelove Dawn xx