Showing posts with label Claudine Hellmuth. Show all posts

Friday, 23 August 2013

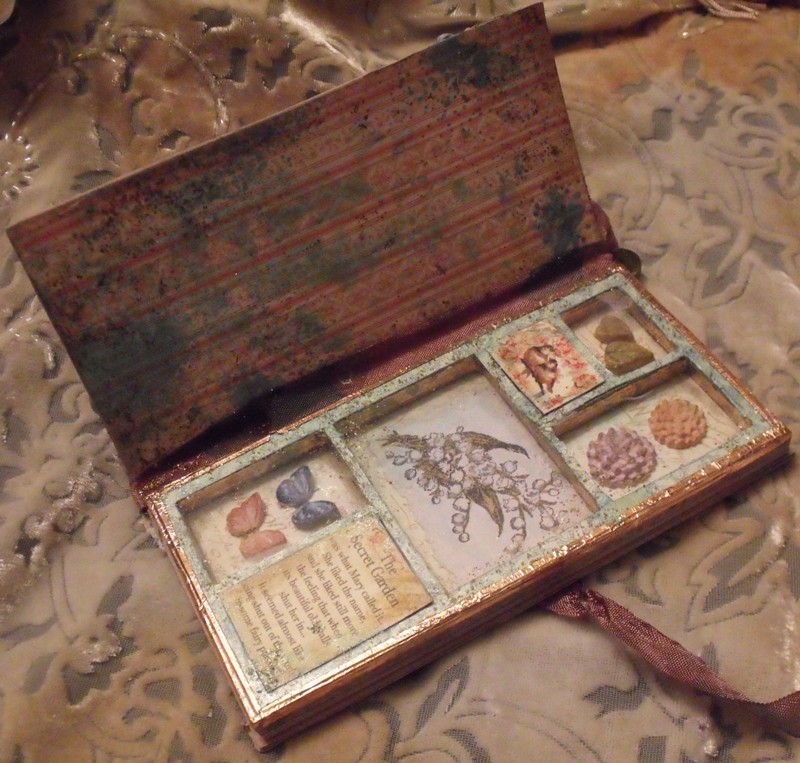
Secret Garden Specimen box for That's Crafty


What's the secret???
Open it up to find gorgeous garden finds :D
I have used Graphic 45 Secret Garden stamps and papers on a Tando covered printers tray to create this pretty vintage style specimen box.

For all the deets visit the That's Crafty blog HERE and to go shopping visit the site HERE :D

here's a close up of the inside ....


Hugs'n'snogs,
Julie xx


Saturday, 4 May 2013

Forget me not...

 
As soon as I saw the Graphic 45 Secret Garden I had yo have it...I'm sure it was made just for me LOL
Its just so pretty and vintage and floral (and the amazing Diane Schultz follows me on Pinterest and often repins my pins ;-) )

I reluctantly cut in to my 8x8 pad to make this project - I have to admit it was cut very carefully and sparingly to maximise its use (...my precious...LOL)

I decided to finally use the giant peg I got from Happy Daze, which I had already sprayed purple with cosmic shimmer agggggeesssss ago - it was a failed Halloween project (never throw anything away!!!)

So to start with I covered the front panels with my paper, sanded and inked the edges lightly and added lace, buttons, seam binding ribbon and distress stickles in Victorian Velvet.All the pieces were glued down with Claudine's Matte Medium.


The frame is some chipboard shapes I already had and matched the panels in the G45 paper perfectly (which was a happy accident rather than planned LOL)
I used Inka gold on all the edges then covered with the paper, sanded and lightly inked with Frayed Burlap.

I decided to make a little blackboard on one side of the frame with some self adhesive black board material I had picked up in The Works ages ago, so stuck it on a piece of plain chipboard.


I covered the other side in the patterned paper with a little bit of layering and tearing to age it, then cut out the panel from the paper pad and glued on.
I added my Forget me not message with Tiny type clear stickers and  highlighted with blobs of glossy accents.

I added some lace to the reverse of one of my frames around the edge then  glued the sandwich together with glossy accents, which dries quickly and really holds the chipboard nicely - just don't get it on your pp.

I glued on the buttons and Prima flowers but it just didn't look finished, so I made some holes with my trusty pokey tool and embroidered through the sandwiched frame.

 The cross stitch looked pants on the reverse side so I covered a chippy heart and glued over the yucky stitching ;-)


The little dangly is a scrap piece of chippy covered in paper and die cut with a sizzix jewellery die with buttons added on jump rings.

To finish it off I added more distress stickles and rock candy stickles because I just have too add sparkle (it's the inner magpie in me ;-) ).

So now I have a cute little memo Blackboard that I can write my important messages on, that looks really pretty just sat on my desk :D

Oooo it felt really good getting inky and stickled again after all this time!!
Watch this space ;-)

Hugs'n'snogs,

Julie xx


Monday, 4 February 2013

Ellie's canvas...


 Morning everyone, thought I would share the canvas I decorated for my great niece Ellie's christening yesterday.
I had thought about giving a different gift, but having spoken to Ellie's mum she would have been devastated if I hadn't given her a canvas to go with Reece's LOL

To be fair, its hard to go wrong with such a cute pic isn't it LOL :D fairy babes are my fave :D

I started by painting the canvas with 3 different colours of acrylic paint wiped on with a dry baby wipe. i love the way they blend and you don't have such a heavy coat when applied like this.
I searched through my scrapbook papers until I found the perfect combo, I think the shaped piece is Penny Lane by MME and the floral print is out of a baby girl paper stack - possibly DCWV but the front cover was missing LOL. The piece under the name was a very old piece left over from an old project when I first bought my cricut, which just so happened to be perfect for this project :D

They were single sided papers and I didn't really want white edges on my torn paper, so I inked the back first to colour them before distressing them with my TH distresser and more ink :D

The lace is coloured with distress reinker in a mister, then glued on with Claudine's matte medium.

The pretty flowers were a spray I picked up in Dunelm Mill when I bought the canvas and work so well with the colour scheme.


The photo was printed on to canvas photo paper and I tinted the black area with a little acrylic paint just rubbed on so it was light.
I used rock candy distress stickles on the wings and when dry I highlighted the details on the photo with a clear Sakura glitter pen.
Ellie was wearing a flower headband in the photo so I emphasised this by gluing on little paper flowers, 

I used Fancy Pants and Prima stamps with my Victorian Velvet ink pad which I also highlighted with the Sakura pen.

The letters are gorgeous Pink paislee mistables spritzed with Victorian velvet again.

when everything was dry I added lots of distress stickles randomly and to age the lace etc...
Everything was finished off with a spritz of frayed burlap distress reinker in Frayed burlap.

I hope they like it :D

Julie xx


Saturday, 18 August 2012

Sweet dreams are made of this.... **pic heavy post!!

I finally finished my Victoriana/shabby chic dream catcher and I'm sooooo in love with it:D
I used bits and pieces from all over including ebay, Happy Daze, my local craft shop Crafty Workshop (where I bought the beautiful Tilda fabrics I used through out the project :D The moon face is from Graphics Fairy.
I used a lot of Claudines sticky back canvas, and multi matte medium throughout this project, and lots of beads, buttons and objects I have gathered over time :D
Ok, I will just show you the pics...


I think I might have sweet dreams tonight :D

Hugs'n'snogs,
Julie xx

Friday, 11 May 2012

Crafty sew'n'sew for Happy Daze

I have had this idea in my head for a while and finally got around to putting it in to reality :D
I started with one of these fab hardboard collage frames and a papier mache torso.

I cut the torso in half and glued it on to the frame with glossy accents, then gave it a few coats of white gesso as a base.

When completely dry I covered the whole thing with pieces of a vintage sewing pattern glued down with Claudines matte medium.

When dry I painted it with a wash of Claudines studio paints in painterly pink and  sky blue mixed with traditional tan to give it a more vintage look.

I love that it has tinted the paper but you can still see the original print :D

I stamped around the edge in archival ink with these amazing BLOCKHEADS stamps

To finish I added buttons and other sewing ephemera and distress stickles.

If you haven't already go and check out all the NEW ITEMS in the shop as Moira has added some lush new lines that will defo have you parting with your pennies :D

Hugs'n'snogs,
Julie xx

Sunday, 29 April 2012

Daisy's christening canvas...

 
Well I am not one for repeating my work but I had a special request from my Niece who loved her babys christening canvas so much she wanted me to make another for her friends baby who is being christened today.
I couldn't make it exactly the same or it would have taken away the uniqueness of Emily's piece.

So as the little dimpled cutie is called Daisy I added some TH tattered floral daisys cut from the canvas to the corner.
I used the same techniques as I did for Emily's with the transfer technique, and used theese lush Prima masks on the corners.

here's a few close ups for you :D


Hugs'n'snogs,
Julie xx

Sunday, 1 April 2012

Kvissle..... bless you!

No I didn't really sneeze really LOL
Instead I bought this amazing new storage for my craft space from Ikea for just £19.99
I am very impressed with it already - its white coated metal, a4 size and the drawers slide completely out so you can easily remove them and place them on your work space when you are working.

I have taken a few pics so that you can see what you can get in those fabby drawers.
 You could fit 48 distress ink pads
 Inkpads stack 3 high and two back this way and would go 4 across so that would be 24 inkpads
Studio paints fit 5 back so I can easily top up and get all 15 colours :D
the mediums and mini bottles are too tall, so are stickles and alcohol inks.
 12 inka golds
 sizzix dies 3 high and will fit two bigz XL side by side
 completely removable to sit on your work space
 ooodles and doodles of embossing powders or distress crackle paint


 I think you would get 27 inkpads this way

And even better, it fits nicely inside my cupboard :D
hugs'n'organised snogs,
Julie xx