Saturday, 30 April 2011

Mirror, mirror in my hand........

I found some cool little compact mirrors this week so have been very busy altering them - in between walking the dogs and watching the Royal Wedding :D

Comgratulation to William and kate on their beautiful wedding and WOW at that dress!!!
I Love, Love, Loved it :DOk,back to the mirrors :D

I will have more to share with you soon hopefully as I am planning on selling these when I get round to booking my craft fair :D

Hugs'n'snogs,
Julie xx

Thursday, 28 April 2011

Mad hatter shrine


Well this started life as a plain wooden shrine frame which I coloured with Tim Holtz broken china distress stain - ooooohhh these babies are so cool :D the colour is so intense and it works lovely on raw wood like this :D

Now you might be thinking the dabber top is a little bit big to fit around the detailed areas?well your right! so all I did was squeeze some of the stain on to my non-stick craft mat and painted it on with a paint brush :D

When it was completely dry I glued on the pieces of my Alice book I wanted to use with Claudines matte mediumand inked lighlty with the stain.

I added stamped Alice images with black archival ink randomly all over the frame, then highlighted the edges with viva decor inka gold.

Now for a bit of alchemy - my metal charms were all silver so I brushed on more inka gold to change the colour, which I also did with my resin keyhole :D

The Mad hatter image was coloured with promarkers and distress ink pads.

I added a key on a screw in eyelet then added some distress stickles.

All the embellies were stuck on the matte medium - its amazing as a glue as nothing budges!! Ihad my reservations when Ifirst tried it as its so light it doesn't feel like it will do anything but its just so strong!!

The embellies I added to my i-pod cover are still rock solid and it gets plenty of abuse in my bag LOL :D

Are you all ready for the royal wedding??

I'm really looking forward to seeing the event and most of all can't wait to see the dress :D

Hugs'n'regal snogs,

Julie xx

Wednesday, 27 April 2011

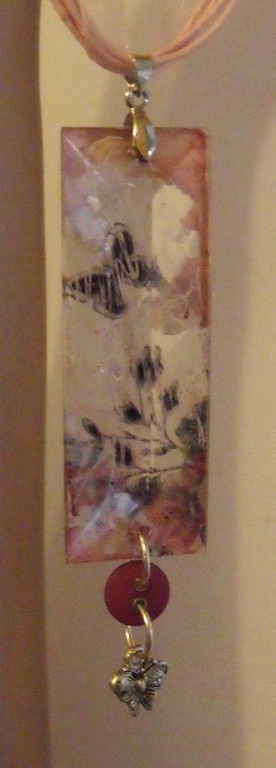
its crystal clear.........


......how much I enjoy making jewellery with a difference :D
A while ago I bought a chandelier from that well known auction site with the intention of taking it apart to use the crystals - I finally got a round-to-it :D and I finally found the round-to-it to blog the results so far LOL :D now I just need one to photograph the rest and share them with you :D

watch this space for more jewellery soon :D
hugs'n'snogs,
Julie xx

Tuesday, 26 April 2011

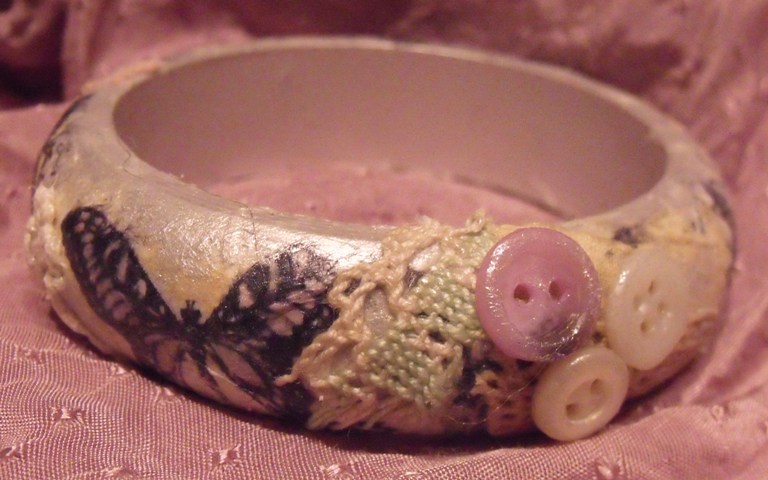
Made of wood............a bangle :D


Well there isn't long left to enter the Happy Daze facebook challenge which is currently "made with wood"

I used one of THESE fabby bangles as my wooden base :D

I coloured it first of all with inka gold in Platinum.
I stamped my butterflies on to fibre paper with archival ink, ripped the edges away to the size needed to cover the bangle leaving frayed edges, then stuck on to the bangle with a glue stick.
When dry I coloured it with promarkers and then brushed on more of the inka gold.
When dry and buffed I glued on the lace and buttons with Claudine Hellmuths matte medium andcoated the rest of the bangle - this is amazing as it just doesn't budge when dry and selals the stamped images.
When totally dry I highlighted areas again with the inka gold.


I am also going to add this to the Simon says stamp and show challenge this week which is to show some buttons .............. buttons??? did someone say buttons :D
no challenge for me this week really LOL :D

hugs'n'snogs,

Julie xx

Sunday, 24 April 2011

Happy Easter!!!!

Happy Easter to you all :D
I had such a giggle trying to find a cute vintage image on google to share with you :D
You should try it - I seriously don't know what they were thinking!!!!

Have you visited the Happy Daze blog this weekend???
Well hop on over HERE for an Eggs-tra special easter treat from Moira , calorie free and all you have to do is comment on Gillians beautiful Timmyesque box (which I have serious craft envy over LOL) for a chance to win a £25 voucher from the shop!!!!

Also have you entered the current Facebook challenge???
Ok, neither have I yet but I have had issues with my laptop - my cable had lots of teeny tiny bite marks along it and for some reason stopped working.................. I wonder who that might have been???? LOL

Anywhoooo - don't forget to visit the Happy Daze facebook page and check out the details for another chance to win a £15 voucher.

The current theme is - Made with wood

Now Moira has got an amazing selection of wooden alterable items for sale in the SHOP and while you are there check out all the fabby NEW ITEMS that have arrived - I wouldn't hand around too long though, because those beauties will fly out I'm sure :D

Have a good weekend everyone :D

Hugs'n'snogs,
Julie xx

Monday, 18 April 2011

Whats for tea...........Fried Marbles???


LOL perhaps not unless you want a trip to the dentist :D

I saw mentioned on the net somewhere last week fried marbles - I had to investigate because it just sounded so flippin odd!!


So how about turning these humble glass marbles in to these lovely crackled beauties??
Now they don't look fab on these pics but they really catch the light with the sun on them :D

I followed the instructions HERE after I fell in love with the beautiful sun catcher :D

The marbles I used where cheap really bashed ones I found on ebay when I just had to have a go :D

I think I will be buying more soon and fancy trying glass pebbles next :D

Hugs'n'sparkly snogs,
Julie xx

P.S> thanks Carol for reminding me it was LINDAS BLOG where I spotted the marbles :D

Saturday, 9 April 2011

as mad as a hatter..............

dontcha just love wearable art???

Why not treat yourself to a cutie patootie TOP HAT to alter complete with clips to attach to your hair:D

And if you aren't inspired by my creation pop on over to the HAPPY DAZE BLOG where Moira, Jo and Carol have also created some incredibly natty head gear :D

I used dip it resin and wire to create my hearts then wired them all together to make a spray, then used wire wrapped around the hat to attach them.

I stamped an Alice image and added it to a metal frame then coated it with glossy accents and stuck it to a bow on the front of my hat.

Next I added feathers, clock hands and a few charms with an Alice theme to the wire work.

Pity we missed ladys day at Aintree yesterday :-( the luck best dressed lady won a fabby holiday to St. Lucia!!!

Oh well, maybe next year LOL :D
heres a few more pics for you to see in more detail :D
Hugs'n'mad snogs,
Julie xx

Thursday, 7 April 2011

Pink Parisian chic


I got this gorgeous wooden house from Caroline a couple of week ago an unfortunately (I think LOL) they have sold out at the moment :( Such a pity because I really want some more now LOL :D

I started by painting the whole think with white gesso and leaving it to dry thoroughly.

I gave it two coats of pink acrylic paint using a foam brush to get in to all the little tight corners.

I cut random pieces of patterned paper to the size of the apertures, distressed the edges then inked with black soot distress ink.

I stamped my images using black archival ink then stuck the pieces of paper in to the apertures with a small amount of glossy accents.

My pretty pin up girl was stamped three times on to white cardstock and decoupaged with silicone glue. I highlighted the hair, lips, dress and shoes with promarkers to give the effect of a tinted photo.

My lock and key were coloured with inka gold - the key was originally a bronze colour and didn't fit with my theme.

All the elements were stuck down with Claudine Hellmuths matte medium.

Have fun if you manage to grab a cute little house to alter :D

Hugs'n'snogs,

Julie xx


Saturday, 2 April 2011

Dragonfly duet altered pocket watch :D


Well, this turned in to quite a labour of love - in other words a chore!!! LOL :D

I treated myself to some resin a while ago and I was a little bit scared of it!!!
I made some little embellies to start with but it wasn't right and I started this project and couldn't get it to dry :(
I realised I wasn't getting the mix right!!

Luckily you can layer up resin and can't see where its layered so I finally got the mix right today to finish off this piece :D

I used my dichroic technique with croco to start with.
I coated my piece of lace with matte medium on both sides because resin soaks in to the fibres and it would become invisible with the resin - the same happens to paper!!

I stuck my embellies down with glossy accents then layered in the resin.

I finished it off by colouring the embellies with inka gold and adding a little bit of distress stickles on the resin to hide my pokeyisitdryyet finger prints :D

I'm so disappointed that you can't see the depth in the photo :( and blogger won't let me add anymore for some reason :(

yeyyyy I can now :D

Hugs'n'snogs,
Julie xx

Wednesday, 30 March 2011


My Mum loves reading so what better present to make her than a pretty bookmark :D

The metal blank was bouught at my local craft shop but can be found for not a lot of money on the internet.

To embellish it I used pieces of broken jewellery, a few charms, my signature piece - buttons :D and of course some Tim Holtz fragments.

I didn't really understand what fragments were when I first saw them on the internet but they are such a cool little piece of kit when you get playing with them and you get loads!!! :D

I used a couple of pieces from the charm set and adhered them to some double sided paper with glossy accents by coating one side of the fragment, placing on the area I wanted to feature on the paper, and wiggling a little bit to move the glossy accents until it was evenly coated.

When dry I cut around the shape and sanded the edges.

To finish them I stamped them with Prima mini stamps with archival ink in plum - these are amazing stamps for small projects as there are so many small images to choose from.

Everything was linked together with jump rings - which Tim also does - how fabby would one look with some of the baubles mixed with fragments and keys??

Or perhaps you could do a cute easter gift instead of eggs - stamped shrink plastic charms would look so cute :D

Or how about putting photos of your loved ones on the fragments to create a lovely keepsake.

Hugs'n'snogs,

Julie

Sunday, 20 March 2011

My distressing is now organised :D

Well as I mentioned on Saturday I bought the teabag box from Moira to organise my blending foam - well look how the decorated box has turned out :D


Here's how to.........

Start by painting it with white gesso, then paint it with white acrylic paint.

When dry I add on some TH tissue tape to strengthen the hinged lid and to add decoration.

Rip a piece of patterned paper - I used a piece from a book of sheet music.

Stamp background stamps randomly in acrylic paint - I used a Ranger paint dabber in pearl then colour with distress inks. When dry rub the stamped images with a very slightly damp cloth to remove the ink and reveal the image.

Next coat with a crackle medium -mine was from a local craft shop.When dry paint with a top coat of your choice.
Rub in distress ink with a piece of cut and dry foam to age the colour and highlight the cracks.
Paint on a thin coat of Claudine Hellmuths multi matte medium - the distress ink will lift but settles in the cracks of the paint.
Glue on a chipboard shape to the lid and cover with scrunched up tissue paper stuck down with the matte medium. When dry I highlighted it with distress ink.
Add on more tissue tape - I randomly added it to corners and on the back of the lid to give the impression the box had been repaired, then inked with vintage photo DI to age it.

For the top I chose a selection of random elements I have collected and started playing around with how I like them placed.

The girl is stamped on to a piece of vellum and stuck down by the objects around her and the optical lens.The piece of canvas was created with the faux batik technique I used HERE.

When you are happy with your arrangement glue the items down with the matte medium - because it dries clear it doesn't matter how messy you are - but you won't be able to ink again as it will resist.
Smear on some Distress stickles to highlight areas as much or as little as you like - I love its subtle aged shimmer.
Once I was happy with the top I started stamping around the sides and using TH distress embossing powders on some of the images to add a little bit of texture.
Again I added embellishments - mainly buttons, some mosaic pieces, a couple of tags from clothes (got to love River Islands mini masterpieces :D), lace and a scrap of the Batiked canvas I had cut off.

Then its time for the inside :D
It was already painted white and I crackled the inside of the lid at the same time as the rest of the box.
The sections were just spritzed with a combo of Cosmic Shimmer mists and edged with the tissue tape - this doesn't stick too well so needs coating with the matte medium to hold it down.

I decorated mine to house my blending foam on the cards I shared with you On Saturday but you could yours for anything you want!!
The cards I have cut are 6.5x6.5 Cm's so if its smaller than that it should fit :D

  • What about your ideaology bits and pieces?? some of those are quite hard to store in traditional boxes.
  • Or if you have a lot of small stamps you could index them - or even store them in there - the Prima minis would just and no more fit if you cut the strip of gems off and trim the bottom.
  • Or index your ideas that you just never seem to get around to trying, but then can't remember what you wanted to do when you find time??
  • Or make a memory box?
  • You could cut cards to fit and store ribbons or lace.
  • If your a scrapbooker or card maker you could print or draw design sketches you want to use at a later date.
  • They aren't quite tall enough for stickles or alcohol inks but the lid could easily be removed if you wanted open top storage.

You want one now don't you LOL :D

This was created for HAPPY DAZE and SCROLLS WORK STAMPS and nearly all of the items used are available from Moira.

Moira's next Facebook challenge is starts today and the theme is "in a Vintage style...." so hopefully this project will inspire you to dig out all those fabby embellies we all like to hoard and stick them on a project :D
Or perhaps you have some amazing stamps???
Moira stocks the fabulous Scrolls Work stamps and they have many stunning vintage images :D

It doesn't have to be a big project like this one, it can be a card or even a tag but make sure you upload to the Facebook page HERE for the chance of winning a £15 voucher :D

Hugs'n'snogs
Julie xx

Saturday, 19 March 2011

Distress blending foam organisation???

Ok, so I was getting frustrated with my foam pads chucked in a a zip lock bag, which I had to -
A. rummage through to find the piece I wanted
B. find the bag from its hiding place in the first place!!!

A thread was started over on UK scrappers a while ago and I absolutely fell in love with this idea by lebosiNifty huh???

Well I decided I had to copy it because it was such a fab idea but decided to take it a step further - being me hahaha:D

So when I got this fabby teabag box from Moira at Happy Daze the light bulb moment happened :DI cut pieces of white cardstock to fit inside the sections but smaller than necessary as I wanted to laminate them.
Distressed the edges with my tool- which in hindsight I wish I had left until after I had inked them LOL.


I inked one side completely plain but showing different depths of the ink colour.

The other side I decided to show different techniques using the blending inks so started by using the ones from Tim's book Compendium of Curiosities.
When I had finished each one I wrote on the front the name of the ink pad, the technique with page number and materials used.

I didn't want them to get all inky when they are in the storage box so wanted to laminate them -only trouble is I don't have a laminater!!!

So I found a huge roll of clear packing tape my hubby had brought home and encased them in that - using an old giftcard to burnish it thoroughly :D
I cut away the excess tape then stuck on a piece of hook velcro to hold the foam pad.

The stamps are both Scrolls Work - #2551 sequin waste and #2543 leafy flourish.


Its a Genius idea isn't it, so huge thanks to lebosi - aka Isobel, for the inspiration :D

I am mid way through the storage box so don't forget to come back and see how it turns out :D

Hugs'n'inky snogs,
Julie xx
Friday, 18 March 2011

Ollie's first walkies :D

Well guess who we went to visit today???
Yup.............Ollie :D

How cute is my wee man :D

"I can't say cheese I'm only a pup!!"


"Hmmm looks interesting but tastes YUK!"

"Is it time to go home now???"

Hugs'n'snogs,
Julie xx

Thursday, 17 March 2011

Ollie LO :D

Evening everyone :D

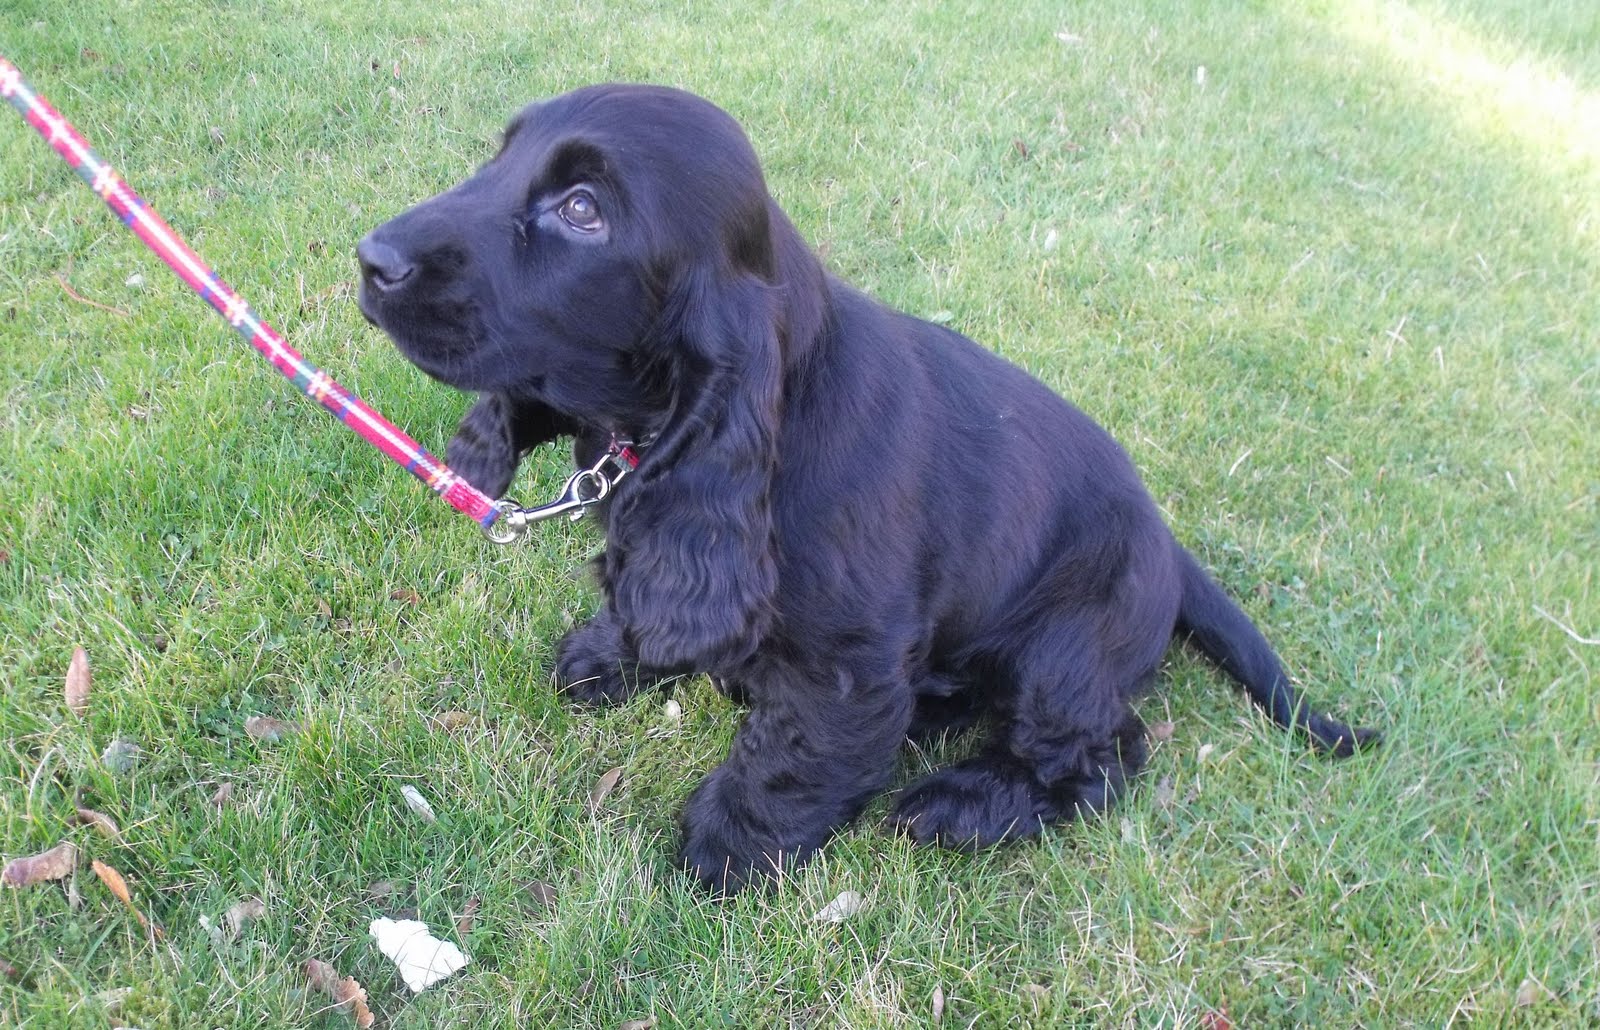
I have another LO for you this week of my gorgeous Pupster who is now named Ollie :D

I bought him and Rolo tags with their names on this week ready for him coming to live with us, which inspired this weeks layout :D

I started by printing the photo on to canvas paper - downside to this is it doesn't photograph well as it has a glossy surface.

I ripped a hole in the Cosmo Cricket paper and used a distress tool around the edges of the frame and around the outside edge of the paper.

Next I used Crushed Olive and Wild Honey distress inkpads and covered the whole paper Tim-style blending the colours together as I went.

I then spritzed with Cosmic Shimmer mist and diluted Spiced Marmalade re-inker.

I tore random holes in the paper and distressed these too and backed with a cute paper which looks like balls bouncing (Rolo is obsessed with balls do Ollie won't get much of a look in with any I don't think LOL).

Ollie 4 by Julie Dandy

Inspired by the paper I used a circle of chipboard, painted it a deep red and added the stripe to look like the balls on the paper. I also took a smaller circle, punched a hole and covered with silver inka gold. when dry and buffed I wrote his name and the date with a fine tip pen - because its a hard nib it looks like an etched tag :D (I planned it really LOL)

Ollie 3 by Julie Dandy

I used the cut off strip from the paper and an embellie from a co-ordinating strip and layered them up in the corner.

I then randomly stamped it with a Scrolls Work stamp #2547 mesh, and Olive archival ink.

It turned out quite a cheap and cheerful layout not using any proper embellies but I love its grungey simplicity:D


Hugs'n'snogs.

Julie xx

Sunday, 13 March 2011

Introducing Ollie :D

...........our cutie patootie pupster :D

He is a show cocker spaniel and is about 9 weeks old, and we collect him in 4 weeks time :D

Watching him run around with his mum and sister yesterday I think we might be in for some fun for a while with him and Rolo LOL :D

I can't wait :D

Hugs'n'sniffy puppy snogs,
Julie xx