Showing posts with label Bubbly Scrumptious. Show all posts

Thursday, 19 May 2011

How Curious????


How amazing are my new Indigo Blu stamps :D I got them at their launch at Port Sunlight last week and fell in lurve!! Only problem is I want the whole range of stamps LOL :D

Ok so how to :D

I started by covering my cute little house in a piece of text from my Alice book .

I stamped over the whole thing with my crackle stamp in coffee archival ink and left to dry.

Next I stamped the ruler along the edge in black ink, masked the edges and coloured with wild honey distress stain - two swooshes and it was done :D

I coloured the rest of it with barn door distress ink pad and added a clock and an ink blot stamp in black archival ink.

I stamped the white rabbit on to a separate piece of paper and coloured with promarkers and stuck it to my house with Claudine's matte medium.

I masked the rabbit off and sprayed the watch with gold cosmic shimmer mist but found this dulled the stamped image too much. I decided to stamp the watch section again on to acetate and when dry cut out and glued over the original stamped image with a little glossy accents.

I added the tiny type letters and glossy accented them and left to dry overnight so I wasn't tempted to stick my fingers in to check if it was dry LOL :D

I added walnut stain distress stickles randomly to add a little subtle sparkle around the edges carefull applied with my splodgey finger :D

Alice was stamped onto white shrink plastic with coffee archival ink and coloured lightly with pencils - the colour intensifies so much when it shrinks so if you are too heavy handed it looks awful.

I left a tab at the top of Alice when I cut her out and punched a hole so that she could dangle in the bottle.

Once shrunk with my heatgun I added little eye hooks to the cork of the Tim Holtz bottle and attached Alice with a jump ring .

I threw in a teeny key then put the cork in and wrapped the neck of the bottle with bakers twine and added a hand written tag.

To attach it to the house I drilled a little hole and threaded a piece of wire through then wrapped this around the eyelet in the cork.

I also made little holes at the top of the house to add more wire to hang the piece up.

I am going to enter this in to the Altered Alice challenge this month fotr the theme of time :D

Hope you like it :D

Hugs'n'snogs,

Julie xx

Thursday, 5 May 2011

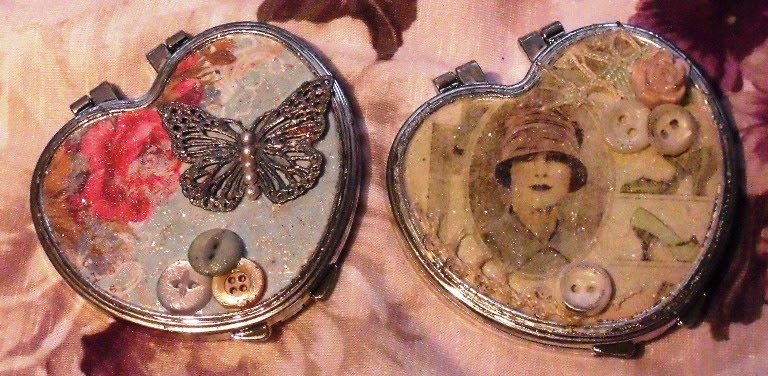
Compact and beautiful


Heres another pair of compacts to share with you and I have to say I think these are my faves :D
How pretty and vintage are they :D
I used Prima and Graphic 45 papers to alter these compacts.

Want to know how to??? I have blogged these over on Bubbly Scrumptious so head on over HERE for the deets :D
While your there don't forget to take a look at the other design teams gorgeous work :D

heres a closer look for you :D


Hugs'n'snogs,
Julie xx

Thursday, 28 April 2011

Mad hatter shrine


Well this started life as a plain wooden shrine frame which I coloured with Tim Holtz broken china distress stain - ooooohhh these babies are so cool :D the colour is so intense and it works lovely on raw wood like this :D

Now you might be thinking the dabber top is a little bit big to fit around the detailed areas?well your right! so all I did was squeeze some of the stain on to my non-stick craft mat and painted it on with a paint brush :D

When it was completely dry I glued on the pieces of my Alice book I wanted to use with Claudines matte mediumand inked lighlty with the stain.

I added stamped Alice images with black archival ink randomly all over the frame, then highlighted the edges with viva decor inka gold.

Now for a bit of alchemy - my metal charms were all silver so I brushed on more inka gold to change the colour, which I also did with my resin keyhole :D

The Mad hatter image was coloured with promarkers and distress ink pads.

I added a key on a screw in eyelet then added some distress stickles.

All the embellies were stuck on the matte medium - its amazing as a glue as nothing budges!! Ihad my reservations when Ifirst tried it as its so light it doesn't feel like it will do anything but its just so strong!!

The embellies I added to my i-pod cover are still rock solid and it gets plenty of abuse in my bag LOL :D

Are you all ready for the royal wedding??

I'm really looking forward to seeing the event and most of all can't wait to see the dress :D

Hugs'n'regal snogs,

Julie xx

Thursday, 7 April 2011

Pink Parisian chic


I got this gorgeous wooden house from Caroline a couple of week ago an unfortunately (I think LOL) they have sold out at the moment :( Such a pity because I really want some more now LOL :D

I started by painting the whole think with white gesso and leaving it to dry thoroughly.

I gave it two coats of pink acrylic paint using a foam brush to get in to all the little tight corners.

I cut random pieces of patterned paper to the size of the apertures, distressed the edges then inked with black soot distress ink.

I stamped my images using black archival ink then stuck the pieces of paper in to the apertures with a small amount of glossy accents.

My pretty pin up girl was stamped three times on to white cardstock and decoupaged with silicone glue. I highlighted the hair, lips, dress and shoes with promarkers to give the effect of a tinted photo.

My lock and key were coloured with inka gold - the key was originally a bronze colour and didn't fit with my theme.

All the elements were stuck down with Claudine Hellmuths matte medium.

Have fun if you manage to grab a cute little house to alter :D

Hugs'n'snogs,

Julie xx


Wednesday, 30 March 2011


My Mum loves reading so what better present to make her than a pretty bookmark :D

The metal blank was bouught at my local craft shop but can be found for not a lot of money on the internet.

To embellish it I used pieces of broken jewellery, a few charms, my signature piece - buttons :D and of course some Tim Holtz fragments.

I didn't really understand what fragments were when I first saw them on the internet but they are such a cool little piece of kit when you get playing with them and you get loads!!! :D

I used a couple of pieces from the charm set and adhered them to some double sided paper with glossy accents by coating one side of the fragment, placing on the area I wanted to feature on the paper, and wiggling a little bit to move the glossy accents until it was evenly coated.

When dry I cut around the shape and sanded the edges.

To finish them I stamped them with Prima mini stamps with archival ink in plum - these are amazing stamps for small projects as there are so many small images to choose from.

Everything was linked together with jump rings - which Tim also does - how fabby would one look with some of the baubles mixed with fragments and keys??

Or perhaps you could do a cute easter gift instead of eggs - stamped shrink plastic charms would look so cute :D

Or how about putting photos of your loved ones on the fragments to create a lovely keepsake.

Hugs'n'snogs,

Julie

Thursday, 17 March 2011

Ollie LO :D

Evening everyone :D

I have another LO for you this week of my gorgeous Pupster who is now named Ollie :D

I bought him and Rolo tags with their names on this week ready for him coming to live with us, which inspired this weeks layout :D

I started by printing the photo on to canvas paper - downside to this is it doesn't photograph well as it has a glossy surface.

I ripped a hole in the Cosmo Cricket paper and used a distress tool around the edges of the frame and around the outside edge of the paper.

Next I used Crushed Olive and Wild Honey distress inkpads and covered the whole paper Tim-style blending the colours together as I went.

I then spritzed with Cosmic Shimmer mist and diluted Spiced Marmalade re-inker.

I tore random holes in the paper and distressed these too and backed with a cute paper which looks like balls bouncing (Rolo is obsessed with balls do Ollie won't get much of a look in with any I don't think LOL).

Ollie 4 by Julie Dandy

Inspired by the paper I used a circle of chipboard, painted it a deep red and added the stripe to look like the balls on the paper. I also took a smaller circle, punched a hole and covered with silver inka gold. when dry and buffed I wrote his name and the date with a fine tip pen - because its a hard nib it looks like an etched tag :D (I planned it really LOL)

Ollie 3 by Julie Dandy

I used the cut off strip from the paper and an embellie from a co-ordinating strip and layered them up in the corner.

I then randomly stamped it with a Scrolls Work stamp #2547 mesh, and Olive archival ink.

It turned out quite a cheap and cheerful layout not using any proper embellies but I love its grungey simplicity:D


Hugs'n'snogs.

Julie xx

Thursday, 10 March 2011

Well what a cutie patootie surprise my hubby gave me this week :D

We have been looking for a little cocker spaniel to keep Rolo company for a while with no luck.............then my hubby, on the pretence my Mum wanted to see me, took me to see this little sweetie :D

07032011190

Apologies for the quality of the pics, but its very hard to capture anything good on a phone camera of a squiggly jiggly 8 week old black puppy LOL :D

Well for the LO I used Cosmo Crickwt through out.

I distressed the edges of the largest piece of paper and inked with TH wild honey ink pad.

I then used a TH mask and spritzed with a combo of cosmic shimmer mist and diluted distress ink in a mini mister.

I tore a piece of paper from the same range and inked with Crushed olive distress ink pad, stuck to the base and added my photo.

I then used the negative part of the mask over the photo and spritzed again.

025

I gave it a blast with my heatgun to dry the inks off, then folded back the bottom corner, stapled and added a piece of contrasting paper behind to re-form the corner of the LO.

I used TH alpha masks to create the title and randomly outlined with a fine tip black marker pen.

022

The question mark was hand cut from the patterned paper and stuck on with foam pads to create some layered depth.

024

I thought it would be fun to add the names that had been suggested or we were considering because of the fun we are having trying to decide.

023

That's the fun part of scrapbooking - preserving the memories of things you will undoubtedly forget :D

So what is my new furbaby's name???

I really love Ollie, but having trouble convincing the other half LOL

Lastly I have to share this pic with you because my other furbaby, Rolo, was just too funny on the way home this afternoon :D

10032011192


Hugs'ncutie snogs,

Julie xx

Thursday, 3 March 2011

Home Sweet Home


This week over on Bubbly Scrumptious I created a cute little canvas in the style of Claudine Hellmuth with this fabby set of chippies from Tando :D

The canvas is just a cheap one I bought in a local shop, which I sponged blue and green acrylic piant on to give me my back ground.

Next I covered the chippies with Claudines sticky backed canvas and cut round them carefully with a craft knife - not a quick or easy job, but worthwhile :D I left the edges a bit rageddy as I like the worn look

I didn't attempt to cover the fence or the gates as they were just a bit too fiddly to cut around, so painted them with my white pearl acrylic dabber.

I used a mix of acrylic paints and Claudines paints tocolour the shapes and left them to dry.

I set them out on the canvas and when I was happy with the composition glued them down with matte medium. I added small pieces of chipboard behind the overlapped shapes to add some dimension.

008

When everything was dry I used a black marker pen to add faux stitching and detail.

I wrote on some small pieces of canvas, stuck them down and added faux stitching.

The cloud was a left over from my i-pod cover from my previous post using the transfer technique.

I finished it by sticking down buttons and lace with the matte medium.


Claudines products are fantatsic to work with and so versatile.

Hugs'n'snogs,

Julie

Wednesday, 23 February 2011

Batik Bridie canvas fun :D


Don't you just love finding new ways to use products you already have??

I do anyway :D

I saw Tim Holtz demo this technique at the weekend and was desperate to have a go :D


I cut a piece of Claudine's sticky backed canvas to the rough size I wanted, peeled the backing off and stuck it to my non stick craft mat.

I then took a very small amount of Claudine's multi matte medium and spread it on to another piece of the craft mat.

I coated my chosen stamp in the medium by swizzing it around on the mat until i hadan even coat,then stamped on to the canvas

Make sure you clean your stamp immediately as the medium won't come off your stamp once dry!!!

I gave the canvas a quick blast with my heatgun to make sure it was dry,then started inking with my distress inks.

Once you have the effect you want take a slightly damp cloth and wipe over the stamped image and the ink will be removed from the medium. As its a matte finish you can't see it on the canvas and it looks like batik fabric.

044

I painted a piece of chipboard with Tim Holtz Crackle paint, blasted with my heat gun then highlighted the cracks with more distress ink.

I then stamped over it with black archival inks and added a quite on an extra inked piece of canvas

When dry I added distress stickles and spritzed with cosmic shimmer mist .

For the hanger I took a piece of american seam binding and coloured it with my distress ink by squishing the ink on my non-stick mat, spritzing with water, then rubbing the binding in the ink, crumpling up, an d drying with my heat gun.

I punched holes with my cropadile,threaded the binding through and tied it in a knot behind the chipboard.

Add some distress stickles and a few metal charms coloured with alcohol inks and your done:D

040

How fun is that???

Now of you go to play :D

Hugs'n'snogs,

Julie xx


Thursday, 10 February 2011


I have had this Maya road chippie for a while and it suddenly hit me when I was looking at my Claudine Hellmuth sticky canvas what I should do with it :D

This is a little wall or door hanger made specially for my little niece Jess :D

I started by drawing around the chipboard on to the sticky backed canvas and cut out so that it was slightly bigger than the chipboard shape.

I placed the sticky side down on the patterned side of the paper I had chosen ( K&co Cut and paste) then burnished with the back of a spoon. I gently scored the paper, dunked in a dish of water and rubbed away the paper to reveal the pattern adhered to the canvas.

When all the paper was removed I enveloped it in a towel and ironed it dry.

I then stuck it on to the chippie with glossy accents - my fave glue as its really strong and dries fast :D

I coated it with Claudines multi matte medium when dry as this hides any little pieces of paper you might have missed when you removed it and makes it look neater. You can fray the edges if you like but I would do it before you seal it with the medium

I inked the edges with a chalk inkpad then used Viva Decor stamps using the same ink pads.

My letters were coated in versamark the dipped and heated in cosmic shimmer utee - what a gorgeous shimmer it gives YUM!! 009

Please excuse the still wet glue on the pic!!!

But how nice is the texture on the canvas - this has to be one of my fave techniques :D

I added a transferred canvas butterfly with some perfect pearls, Prima flowers, gems and buttons.

The T-shirt chippie was meant to be in a mini book so had a hole punched on one side, so I added another hole and a ribbon to create a hanger.

Most of the ingredients are available from Caroline at BUBBLY FUNK :D

Well, I got a lovely suprise today :D

I spotted a gorgeous bag and fell in love with it on my last trip to Carlisle bu Disaster Designs but my hubby wouldn't byme it LOL

Well the lovely girls I work with gave me a belated birthday prezzie today - we were meant to be going out for a meal (which is when they planned to give me it) but I was ill, so today I received this....

Thank you Kerry,Kell and Lou :D

You have made me a very happy peep.............its defo coming to Birmingham with me next week :D

Hugs'n'snogs,

Julie xx

Thursday, 3 February 2011

Lush Leafy necklaces

Hi everyone,

apologies for it being jewellery again from me but when I received these lovely leaf Tando chippies from Caroline at Bubbly Funk I just had to do it :D

I was inspired by a necklace I received as a Christmas prezzie which has a lovely sparkly feather hanging sideways with a little dangley section at one end, so thought I would try and recreate it my way with..................UTEE :D

I painted the small chipboard leaves with Jenni Bowlin brown sugar acrylic paint.

I added holes to three of the leaves with a hand drill and smoothed it off with a nail file.

When dry spritzed them with Cosmic Shimmer mist in Golden Mint and left it to dry.

I then wrapped around artist wire creating a loop at the small end and leaving a nice long piece at the other end so I could use it as a handle for dipping in the utee.

I inked a Viva decor swirl stamp with versamark ink and put to one side

I heated some clear utee in my meltpot - you could do this with e foil tray if you wanted but heat from below so that your utee doesn't blow everywhere. When completely melted I added a little bit of Cosmic Shimmer utee in Tropic Pearl and Lapis Jade and swirled together with the end of a brush.

I dipped the chipboard shapes in until completely covered then removed and placed on an acrylic block, while hot I pressed in the swirls stamp to create some texture.

When cooled I created another loop on the end of the leaf and would the excess around the centre of the leaf randomly as I had done earlier (now encased in the utee)

I trimmed the edges of the utee with small sharp scissors and a craft knife until I was happy with the shape then smeared on some Distress Stickles in bundled sage and antique bronze.

I then slid it on to a neckwire I bought in my local craft shop and added more wire to hold it in place, added a few trimmings and some dangley beads :D
The second necklace was exactly the same except I drilled a hole in one end and threaded wire through to create my loop.

I love the texture of the stamped utee and the added sparkle of the cosmic shimmer utee :D

Hope they inspire you to have a go with utee - its so much fun :D

Hugs'n'snogs,

Julie xx

Wednesday, 26 January 2011

Steampunk style grungeboard choker

037

Well what a busy week last week was, but I nearly got this choker finished for you LOL :D

I haven't added the findings yet as I'm waiting for some ribbon to arrive.

I started with a strip of plain GRUNGEBOARD and painted on slighlty watered down VIVA DECOR INKA GOLD in graphite - I mix it on the lid with a water brush until its a nice creamy consistancy and paint on a few layers.

When its dry buff with a soft cloth or tissue.

Next I stamped my ScrollsWork gears stamps inversamark ink randomly all over the grunge and embossed with Tim Holtz DISTRESS EMBOSSING POWDER.You have to be patient with the distress powder and wait until it cools or it will all brush off.

038

I repeated the same on a grungeboard disc - when I heated it it curled on the edges turning it in to a dish shape, so I took advantage and added melted clear utee to make a pendant and added some watchparts and a metal flower.

041

I punched holes in the choker section to add the chains and rings which the ribbon will be attatched to, and added some flowers made using my DICHROIC TECHNIQUE, prima say it in studs centres and a metal dragonfly.

I love this grungey but pretty look and the mix of textures and metals.

Hugs'n'snogs,

Julie xx

Wednesday, 5 January 2011

Grungey little Scrolls Work Angel

007

This week for my Bubbly Scrumptious piece I decided to create a cute little grungey frame using some of the Tim Holtz techniques I have learned this year, part of which are from the 12 tags of Christmas.

I started by sticking a scalloped frame to a square frame, both of chipboard.

Next I randomly stuck tissue tape collage style over the frame used an embossing tool to shape the tape around the scallops.

I then inked the whole thing with Meadow and Willow alcohol ink which I had applied with a piece of felt as Tim did HERE.

I stamped my Scrolls Work stamp - Althya on to a light coloured piece of Prima patterned paper in Crimson archival ink using a brayer to apply the ink to the stamp - I wanted it to look distressed so didn't ink it thoroughly.

I coloured the image with Rusty Hinge and Bundled sage distress ink.

Once dry I glued the stamped image to the frame

I added some frayed burlap distress stickles to the frame and the stamped image.

Next I inked my chipboard swirl with Walnut stain distress ink and coated it with Rusty Hinge distress embossing powder. When cool I brushed away the excess and inked the exposed patches and edges with the walnut stain ink and glued it to my frame.

I then made two tissue tape flowers following Tim's video tutorial


I glued them on , spritzed them and added some vintage buttons with a nice blob of the distress stickles delicately smeared on.

Doesn't she look cute?

I have added this to Studio L3's Compendium of Curiosities week 26 challenge where there is a fabby prize up for grabs :D

And also to the Simon says stamp and show blog whos challenge this week is to showyour newest stamp :D

Hugs'n'snogs,

Julie xx

Monday, 27 December 2010

2010 favourites award ceremony starts here ...........NOW!!!

I got to thinking about my crafting year and what teh highlights have been - fave products I have discovered , events, etc...........

So for anybody who is interested this is my top ten of my 2010 crafting journey :D

At Ten...........
discovering utee and all the things you can do with it thanks to Suze Weinberg :D
I have enjoyed experimenting and even the singed fingers when I just 'forget' how hot it is again LOL

At Nine...........
rediscovering my love of stamps thanks to the girlies over at Zuzus and Moiras amazing selection of stamps (which seem to be sneaking in to my home LOL :D )

At Eight...........
Meeting Claudine and falling in love with Sticky backed canvas!!!
Such a cool product if you haven't got around to using it yet!! Check out my post HERE :D
My fave technique has to be the image transfer which works fabby with scrapbook papers :D

At Seven............
Rebekah asking me to design aproject for her Birthday blog hop and having so much fun with everyone :D
HERES my project if anybody wants to see it

At Six.....................
Discovering altered art thanks to Moira, Ginger, Zuzu and Gillian!!!
The car boots and charity shops are my new fave haunts and I love finding unusual things to alter like my alarm clock, pocket watch and bottle - check out my ALTERED ART BLOG TAB to see them and other projects :D

At Five...........
taking part in the Tims 12 tags of Christmas for the first time ever, and learning some fabby new techniques along the way.
CLICK THIS BLOG TAB if you would like to share my journey

At Four...........
Being asked to be a guest designer at the PINK BOOBY 5 CROP and getting to teach and meet lots of amazing crafters.
I had so much fun and can't wait until next year :D
I even had fun when I was thrown in at the deep end to take over Cals class - thanks guys LOL
Lots of money was raised and lots of money spent with worthy causes supported :D (scuse the pun LOL)

At Three...........
Being part of three amazing design teams!!!

Happy Daze
Bubbly Scrumptious
Scrolls Works stamps

All of the teams are amazingly talented and I get the chance to work with fabby new products.
I feel so honoured to be part of them all and would like to say a HUGE thank you for making me part of them :D

At Two............
Meeting Tim Holtz, the lord of all that is grungey and distressed!!!
Huge thanks to Moira for inviting me to Stitches in February :D I had a bit of a trial getting there but it was so worth it!!!
I got to meet lots of fellow crafters in real life, flesh and blood, the works LOL :D
But I also met Tim!!!
I don't think Moira realised what a profound affect it would have on my crafting (and my bank balance to be honest LOL) !!!

I never really 'got' the whole Tim Holtz craziness until I watched him demo - poor Moira couldn't drag me away LOL

So heres the BLOG POSTS which cover the visit to snowy Birmingham and the NEC.

And in First place..........
Creating my own technique :D
I was in love with Viva Decor Croco from the moment I tried it and couldn't help experimenting to see what it could do :D
I was amazed and in love when I realised I could make a piece of chipboard look like dichroic glass :D
I searched the internet for any techniques and couldn't find anything that uses the same technique as mine :D
SO HERE IT IS if you aren't bored of seeing it already LOL :D
and a few projects I have made using it HERE :D

So what have you all been up to in 2010???
Why not share your top ten with us all :D

I wonder what 2011 will bring to my crafting life????

Hugs'n'festive Boxing Day+1 snogs,
Julie xx

Thursday, 9 December 2010

Wave to Santa

For thsi weeks project on Bubbly Scrumptious I created a cute little Christmas decoration based on T!ms day 8 tag :D

Hugs'n'snogs,
Julie xx

Wednesday, 1 December 2010

TH12TOC - day one :D

Yesterday saw the start of Tims 12 tags of Christmas so I thoughtI would have a go for my Bubbly Scrumptious project this week :D

Now I know its defo not in the league of Tims stunning creation .....

I didn't have most of the items but as Tim himself says the idea is just to give you the inspiration to create your own work.

I started by using the TH alterations sizzix embossing folder set with the snowflakes and snowman, and ran my tag through the snowflake option.

I inked my tag with weathered wood and stormy sky distress inkpad then spritzed lightly with water to give a speckled effect.

I then smeared on rock candy stickles all over then when dry highlighted the debossed snowflakes with frosted lace stickles.

My fence was a torn piece of corrugaeted card painted with pearl paint dabber, covered in glossy accents and sprinkled with Martha Stewart glitter.

My house was cut freehand from two pieces of chipboard in a very random fashion.

I inked the body of the house with Rusty hinge then embossed with Rusty Hinge distress powder.

The roof was inked with stormy sky then embossed with Soot Black distress powder, then highlighted a little with the pearl paint dabber.

I highlighted the snowy areas with glossy accents and added the Martha Stewart glitter then when dry added frosted lace stickles.

The trees stapled on I bought online and are meant to be used as cake decorations.

I then stamped the TH stamp Christmas Miracle on to a piece of scrap cardstock in black archival ink. I cut out the word "believe" and the little calendar page then inked with antique linen, barn door and forest moss distress inkpads.

The word "believe was stapled to the edge and the little calendar was attached with a memo pin.

The last thing I did was highlight a few edges with the pearl paint dabber and added a piece of lace to the tag hole.

Its not as pretty or as technical as Tims, but I'm happy with it :D

Hugs'n'snogs,

Julie xx

P.S. I have just spotted a link to some fabby Christmas tickets to print if like me you don't have Tims stamp HERE

P.P.S if you have a go why not share your creations on ArtyJens splinter group HERE :D

Saturday, 20 November 2010

Christmas Domino Jewellery ideas

002

Hey everyone, are you stuck for ideas for those little Christmas gifts??? How about teachers presents or stocking fillers???

Altered dominoes work out really reasonable, especially if you manage to find some in charity shops, the auction site or bargain shops.

I created these ones for this weeks Bubbly Scrumptious post :D

First I select the design from the patterned paper and cut to the size of the domino, then glue down with the glossy accents.

I use an emery board to soften the edges, then coloured the edges of the domino with inka gold.

I drilled the holes ready for the necklace findings but if you don't have a drill you can buy stick on bales or even glue a bead on to the top with a strong glue (epoxy works best or a glue gun).

I added two coats of glossy accents - don't be tempted to put it on too thick as it will never dry and will remain cloudy.

While its wet sprinkle in glitter of your choice - I really love the effect of the clear one on this set as it seems to give a textured effect like crystals :D

006

You can also add charms, buttons or any other embellies you like while the glossy accents is wet.

Once your happy with the finish you can start adding your jewellery findings - you can pick these up cheaply on the auction site in small quantities.

I coloured my charms with inka gold applied with a paint brush and when dry buffed it with a tissue.

004

Heres a few more example to inspire you :D

011
015
016
023

Hope you like them,

hugs'n'snogs

Julie xx

Thursday, 11 November 2010

Christmas Countdown spinner

Hi everyone :D

This was originally intended to be a piece for Vanilla Sugar but I didn't get it finished before I jetted off to the Dominican :D -Sorrryyyyyy Caroline!!!

So I have used it for my piece this week on Bubbly Scrumptious :D

So how did I create my countdown spinner???

I used Websters Pages Sweet Season throughout :D

Well, my buzz and bloom chippie didn't have the words on it, but other than that it was identical.

I started by covering the back of the back plate with the sweet sprinkles paper.

I covered the front side with the inka gold by watering a little bit down in the lid and painting it onand buffed when dry with a tissue. It did take two coats but it does cover the chipboard better.

I used the spare insert shape to cut out thegreen paper then glued down with glossy accents.

I printed the numbers on to the Safmat, cut out and stuck around the green sections. I actually used an advent kit from two peas but had to cut them down to fit them in so I could have used normal fonts on a word document.

Safmat is fabby as you can create your own rub on like stickers using your printer - fabby for hybrid scrapping :D

I covered the front section of my spinner in the Sugar plum tree paper, then used the second piece to create a 3d effect by cutting out the trees and layering up with 3d foam.

I did the same with the die cut sheet.

Next I added the Prima flowers and embellies and highlighted the decorations on the tree with the glitter pen.

014

I was a bit puzzled how to put it together at first but asked advice while I was at the PInk Booby crop and was given the perfect solution.

I used a spare post from a scrap book :D to cover the screw head I popped on another Prima crystal centre :D

Hope you like it :D

Hugs'n'snogs,

Julie xx