Showing posts with label techniques. Show all posts

Sunday, 12 May 2013

Beadsmith Macrame board.... new toy review!!!


Ok, you might think  "I would never use this - I don't make jewellery..."
BUT if you want to do any type of weaving work I highly recommend this item.
Its made from a really sturdy memory foam with notches all round the edges.
It might seem a very basic tool, but its perfect for the job it does!!!

I tried to do the pearl bead weaving I have on my board on a small bead loom, it was incredibly difficult and nowhere near as neat as it has turned out on the macrame board.

I also made this bracelet from lace and fabric scraps on my beadloom - it would have been sooooo much easier on this board, believe me!!!
Bead weaving is really easy and could be used with some awesome items in your mixed media work, nice fibres, beads, buttons, lace, fabric scraps spring to mind for me...and they don't have to be uniform!!

I wanted to make a thick choker necklace with my pearls and was quite disappointed with how it turned out, so when my macrame board came I took it apart and have remade it - quick and easy!!

To bead weave you start with an extra downward thread (lazy thread) to the amount of beads you are using - I have used 5 beads wide, so have 6 lazy threads.
To make the beading easier I put my bobbin from my original bead loom under the threads near the bottom so that the beads had room to move under my lazy threads. You could use anything really, even a marker pen - just something to lift them from the board.

I attached my beading thread to the outer lazy thread and passed my needle underneath all of the lazy threads. I then threaded my 5 beads on, and spaced them in between the lazy threads.


I took my beading thread around the outer lazy thread, then passed the needle back through the beads over the top of the lazy threads.

Then repeat the whole weaving process.
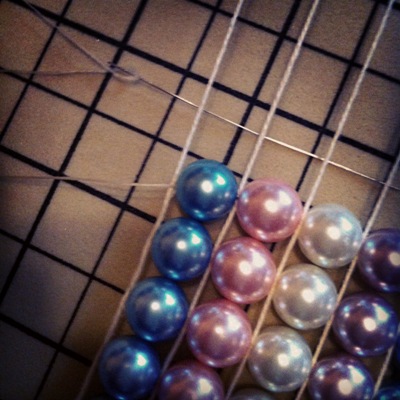
I love the board because of the notches, you can take all your excess threads and secure them on the sides, and even keep your thread secure if you need to leave your work.

Because it is memory form you can safely stick pins in to it, or your needles.  

I got mine from the Jewellery Maker shopping channel but I'm sure you will be able to pick them up in beading shops too.

My beading is nice and straight because I have used beads all the same size but can you imagine the texture you can create with random items and threads - paper beads, shells, bakers twine....
Hope this is helpful to you all,
Let your imagination run riot!!!

Hugs'n'snogs,

Julie xx

edited to add... This is not difficult at all - incredibly easy, and incredibly quick if you use large beads like I did :D

Monday, 18 April 2011

Whats for tea...........Fried Marbles???


LOL perhaps not unless you want a trip to the dentist :D

I saw mentioned on the net somewhere last week fried marbles - I had to investigate because it just sounded so flippin odd!!


So how about turning these humble glass marbles in to these lovely crackled beauties??
Now they don't look fab on these pics but they really catch the light with the sun on them :D

I followed the instructions HERE after I fell in love with the beautiful sun catcher :D

The marbles I used where cheap really bashed ones I found on ebay when I just had to have a go :D

I think I will be buying more soon and fancy trying glass pebbles next :D

Hugs'n'sparkly snogs,
Julie xx

P.S> thanks Carol for reminding me it was LINDAS BLOG where I spotted the marbles :D

Thursday, 30 September 2010

Dichroic flowers....

Ok, so did you have a go at my technique last week??

Well here's another project I created for Bubbly Scrumptious to try and tempt you

002

Sometimes I think its hard when you see a technique to picture how you could use it in your crafting so I do like to play and see what I can come up with :D

And yes Katy, I love getting messy LOL :D

So,I started with a letter O chippie which I covered in the faux dichroic glass and was going to make it in to a mini frame. Then I spotted my Tim Holtz tattered florals die and it went in a whole new direction LOL!!!!

I chopped the O in half to give me a crescent shape and rounded the edges I had cut with scissors.

I punched a hole with my big bite at either end and one at the bottom centre and attached my dangley :D ( a chandelier drop)

I cut out the flowers from chipboard and bent them in to shape to create some dimension. I coloured the reverse with inka gold

I did the faux dichroic glass using salmon pink, wild plum and cranberry alcohol inks and sprinkled in some gold utee.

007

I stuck them on to the crescent with glossy accents and added prima say it with crystal centres

I painted the back of the large chandelier drop with the croco, and inks and uteed it to seal.

009

Then added the jewellery findings which came from a cheap necklace from Primark :D

Here's a few more pics to give you an idea of the depth of colour :D


008

011

013

I hope this helps you see how it can fit in to your crafting :D

Hugs'n'snogs,

Julie xx

Wednesday, 22 September 2010

at last my Faux Dichroic Glass technique :D

037

Ok I have teased you long enough so here it is :D

I am so excited to share this with you all :D

I have been experimenting over the weekend and I genuinely "think" I have invented a new technique to make faux dichroic glass. I apologise if anybody has beaten me to this but didn't we do well LOL :D

I love the lustre of the real thing and the colour changes in the depth.

You can use a melt pot for this technique but I have used my heat gun as most people have them.

Most of the supplies are available from Bubbly Funk

Supplies needed

Viva decor croco paint in platinum or gold

Ranger alcohol inks (2 to 3 colours work well)

heat gun

versamark inkpad

clear utee

glitter if desired

heat proof mat

I used Viva decor croco in platinum and gold as they are nice light colours and take the colours well.

I have used this on different surfaces such as chipboard, a resin domino and a Tim Holtz fragment so far.

Technique

spread your chosen colour of croco paint on to your surface thickly with a palette and either leave to dry naturally or give it a hand with your heat gun. in my examples below the heart is fried with my heat gun and the oval dried naturally - you can see there is a huge difference in the result so it depends what look you want (and how patient you are LOL :D ). 001

next drop your chosen alcohol inks randomly over the shapes - as mentioned two to three colours gives a lovely effect and it looks nice if you don't colour completely.

002

When its dry squish it down in your versamark pad until its completely coated 004

completely cover in the utee (ultra thick embossing enamel)

005

Shake off the excess, being careful not to remove any from the surface and place on your heatproof mat

007

Heat with your gun until completely melted

008

While its hot sprinkle in more utee, but don't overload as it will just blow away when you put your heat gun on to it.

009
Keep adding more until you have a lovely thick domed effect. you can add glitter or metal flakes in as you go if you wish.

Don't use stickles in between layers as the glue reacts with the utee and bubbles like mad!!!

You can use utee coloured with alcohol inks as I describe on my blog HERE to add more depth to your piece.

leave to cool then oohhh and aahhhhh at the pretty effect :D

011

014

You can punch it with a cropadile, and if your not happy with it you can keep melting the utee - it will eventually slide off to a thin layer LOL :D

At the end scrape all your melted excess off and keep in a pot for using again :D

Here's some of my results :D

020

003

008

021

026

047

037

This so effective and addictive please give it a try :D

Please link back if you do because I would love to see what you create :D

Just picture it on larger projects, or altered art..........mmmmm

Perhaps a mermaids tail? or a title or embelly for a scrapbook page :D

Hugs'n'snogs,

Julie xx


Sunday, 19 September 2010

I have been experimenting

..........and I think I may have created a new technique for creating faux Dichoric glass :D

I have to say its incredibly hard to photgraph and get a good shot of the gorgeous lustre that shines through!!!
Check back later in the week and I will tell you exactly how I did this and you can all shout at me that you have heard it all before LOL :D
I have seen it made with polymer clay and fusible film,but not my method so far ;-)

Hugs'n'snogs,
J xx