Showing posts with label canvas. Show all posts

Friday, 23 August 2013

Secret Garden Specimen box for That's Crafty


What's the secret???
Open it up to find gorgeous garden finds :D
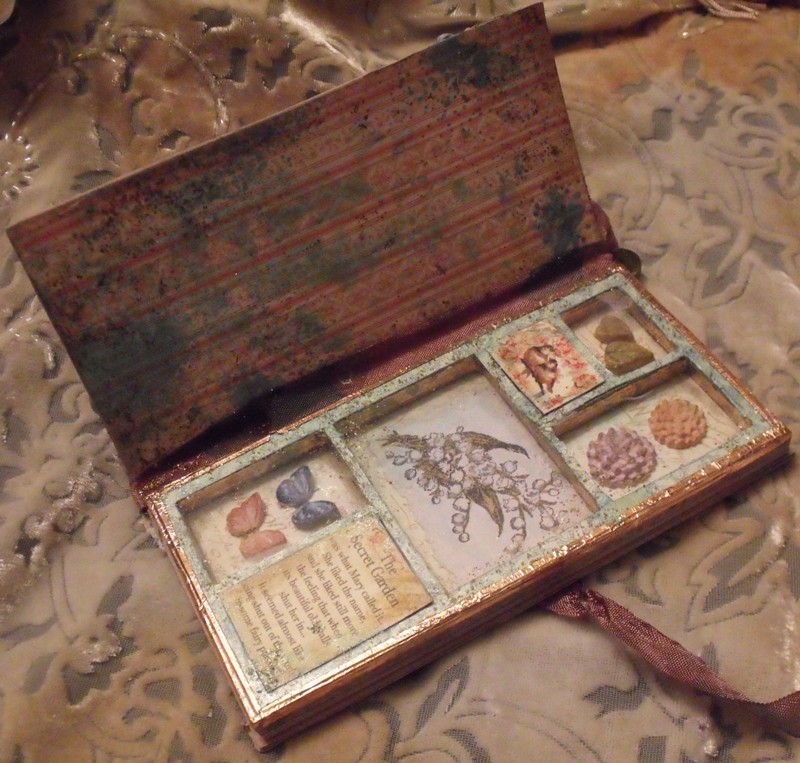
I have used Graphic 45 Secret Garden stamps and papers on a Tando covered printers tray to create this pretty vintage style specimen box.

For all the deets visit the That's Crafty blog HERE and to go shopping visit the site HERE :D

here's a close up of the inside ....


Hugs'n'snogs,
Julie xx


Monday, 4 February 2013

Ellie's canvas...


 Morning everyone, thought I would share the canvas I decorated for my great niece Ellie's christening yesterday.
I had thought about giving a different gift, but having spoken to Ellie's mum she would have been devastated if I hadn't given her a canvas to go with Reece's LOL

To be fair, its hard to go wrong with such a cute pic isn't it LOL :D fairy babes are my fave :D

I started by painting the canvas with 3 different colours of acrylic paint wiped on with a dry baby wipe. i love the way they blend and you don't have such a heavy coat when applied like this.
I searched through my scrapbook papers until I found the perfect combo, I think the shaped piece is Penny Lane by MME and the floral print is out of a baby girl paper stack - possibly DCWV but the front cover was missing LOL. The piece under the name was a very old piece left over from an old project when I first bought my cricut, which just so happened to be perfect for this project :D

They were single sided papers and I didn't really want white edges on my torn paper, so I inked the back first to colour them before distressing them with my TH distresser and more ink :D

The lace is coloured with distress reinker in a mister, then glued on with Claudine's matte medium.

The pretty flowers were a spray I picked up in Dunelm Mill when I bought the canvas and work so well with the colour scheme.


The photo was printed on to canvas photo paper and I tinted the black area with a little acrylic paint just rubbed on so it was light.
I used rock candy distress stickles on the wings and when dry I highlighted the details on the photo with a clear Sakura glitter pen.
Ellie was wearing a flower headband in the photo so I emphasised this by gluing on little paper flowers, 

I used Fancy Pants and Prima stamps with my Victorian Velvet ink pad which I also highlighted with the Sakura pen.

The letters are gorgeous Pink paislee mistables spritzed with Victorian velvet again.

when everything was dry I added lots of distress stickles randomly and to age the lace etc...
Everything was finished off with a spritz of frayed burlap distress reinker in Frayed burlap.

I hope they like it :D

Julie xx


Sunday, 29 April 2012

Daisy's christening canvas...

 
Well I am not one for repeating my work but I had a special request from my Niece who loved her babys christening canvas so much she wanted me to make another for her friends baby who is being christened today.
I couldn't make it exactly the same or it would have taken away the uniqueness of Emily's piece.

So as the little dimpled cutie is called Daisy I added some TH tattered floral daisys cut from the canvas to the corner.
I used the same techniques as I did for Emily's with the transfer technique, and used theese lush Prima masks on the corners.

here's a few close ups for you :D


Hugs'n'snogs,
Julie xx

Friday, 24 February 2012

Sunshine Smile for Happy Daze

I have had my eye on THIS gorgeous Paperbag Studios stamp for some time and when I was browsing them AGAIN this project jumped in to my mind :D

This months theme over on the Happy Daze blog challenge is a little twist on the usual valentines LOVE theme and is techniques you love to use.

I decided to show you my fave technique with one of my fave products Viva Decor Croco which I kind of invented (well I think I did anyway LOL)

I started by by stamping the image in black archival ink on to a piece of white tissue paper and ripped out the image so it had a nice random torn edge. I glued it in place on my canvas with Claudines matte medium.
I painted on some detail to the image with a little bit of wild honey distress stain.

I made myself a shimmer mist by mixing Wild Honey distress reinker and Perfect Pearls in Sunflower Sparkles in a mini mister and spritzed it over a Prima mask
I coloured these lovely Pink Paislee chipboard alphas, which have a fabby resist pattern on them, with Wild Honey distress stain and glued to the top of the canvas with the matte medium.

I tied a piece of white ribbon along the botom edge and knotted it.

I die cut my flowers from chipboard using Tims tattered floral die and coated them with the platinum croco.
When dry I dotted on alcohol inks in shades of yellow and left to dry again, this is important as we want the alcohol to evaporate before we heat them ;-)
When completely dry and alcohol free I squished them on to a versamark inkpad and made sure they were nice and sticky, then sprinkled on UTEE.
The daisy one is coated with pearl (which was a happy accident LOL) for one coat and then clear was sprinkled in while still hot and heated again - it gave it a nice mottled effect.
The other flowers were coated with three layers of clear with a little bit of glitter sprinkled in.

When cool I glued them on to the canvas and added buttons for the centres, then added three little buttons under the word Smile.

To finished it off I added distress stickles randomly in scattered straw to add a lovely subtle sparkle.
I think she is so pretty and definitely makes me want to smile :D
If you would like more inspiration and a tute on my Croco faux dichroic technique please visit THIS BLOG POST.

Hugs'n'smiley snogs :D
Julie xx


Tuesday, 21 February 2012

Mason's Canvas

This proved a bit of a challenge for me as my niece asked me to make this as a gift for somebody with modern style.
Tricky, because my comfort zone is vintage and grungey.
I spotted a really sweet layout on pinterest by Nicole Nowosad and used that as my inspiration.

I tried to keep it cleen looking but it just didn't work!!
She wanted baby blue and orange with neutrals and I spotted this fabby Authentiqe Gathering collection which was the perfect colours, and double sided so I only needed two sheets to get a nie variey of patterns.

I painted the canvas with acrylic paints and crackle claze.

The photo is printed on canvas paper, and I used the excess paper to cover the chipboard hearts before I painted them..
I really like the mini canvas at the bottom.

Its all spritzed with TH distress re-inker in a mini mister with a little bit of sunflower perfect pearls for some shimmer.

hugs'n'snogs,
Julie xx

Monday, 23 May 2011

Live your life be free


Moiras current Happy Daze facebook challenge is called In flight andyou have until midnight on Sunday the 29th of May to upload your work to the facebook page or e-mail your pics here - info@happy-daze.net.
use at least one product which can be purchased from the Happy Daze shop and maximum of 3 entries per person. As usual one winner will be drawn at random to win a £15 Gift Voucher to spend in the shop

I used these fabby GLITZ STAMPS to create Nellie's daring escape from her life at the fairground :D
I also used TH distress stain, Cosmic shimmer mist, Black Archival ink, Versamark ink and clear embossing powder on a canvas board.

Hugs'n'snogs,
Julie xx

Thursday, 3 March 2011

Home Sweet Home


This week over on Bubbly Scrumptious I created a cute little canvas in the style of Claudine Hellmuth with this fabby set of chippies from Tando :D

The canvas is just a cheap one I bought in a local shop, which I sponged blue and green acrylic piant on to give me my back ground.

Next I covered the chippies with Claudines sticky backed canvas and cut round them carefully with a craft knife - not a quick or easy job, but worthwhile :D I left the edges a bit rageddy as I like the worn look

I didn't attempt to cover the fence or the gates as they were just a bit too fiddly to cut around, so painted them with my white pearl acrylic dabber.

I used a mix of acrylic paints and Claudines paints tocolour the shapes and left them to dry.

I set them out on the canvas and when I was happy with the composition glued them down with matte medium. I added small pieces of chipboard behind the overlapped shapes to add some dimension.

008

When everything was dry I used a black marker pen to add faux stitching and detail.

I wrote on some small pieces of canvas, stuck them down and added faux stitching.

The cloud was a left over from my i-pod cover from my previous post using the transfer technique.

I finished it by sticking down buttons and lace with the matte medium.


Claudines products are fantatsic to work with and so versatile.

Hugs'n'snogs,

Julie

Wednesday, 23 February 2011

Batik Bridie canvas fun :D


Don't you just love finding new ways to use products you already have??

I do anyway :D

I saw Tim Holtz demo this technique at the weekend and was desperate to have a go :D


I cut a piece of Claudine's sticky backed canvas to the rough size I wanted, peeled the backing off and stuck it to my non stick craft mat.

I then took a very small amount of Claudine's multi matte medium and spread it on to another piece of the craft mat.

I coated my chosen stamp in the medium by swizzing it around on the mat until i hadan even coat,then stamped on to the canvas

Make sure you clean your stamp immediately as the medium won't come off your stamp once dry!!!

I gave the canvas a quick blast with my heatgun to make sure it was dry,then started inking with my distress inks.

Once you have the effect you want take a slightly damp cloth and wipe over the stamped image and the ink will be removed from the medium. As its a matte finish you can't see it on the canvas and it looks like batik fabric.

044

I painted a piece of chipboard with Tim Holtz Crackle paint, blasted with my heat gun then highlighted the cracks with more distress ink.

I then stamped over it with black archival inks and added a quite on an extra inked piece of canvas

When dry I added distress stickles and spritzed with cosmic shimmer mist .

For the hanger I took a piece of american seam binding and coloured it with my distress ink by squishing the ink on my non-stick mat, spritzing with water, then rubbing the binding in the ink, crumpling up, an d drying with my heat gun.

I punched holes with my cropadile,threaded the binding through and tied it in a knot behind the chipboard.

Add some distress stickles and a few metal charms coloured with alcohol inks and your done:D

040

How fun is that???

Now of you go to play :D

Hugs'n'snogs,

Julie xx


Wednesday, 3 November 2010

I'm back!!!!!

Hola :D

I am back from the Domincan Republic minus a bit of blood thanks to lots of mozzies feeding on me :( which resulted in a visit to the hospital!!!

We still had a good time though and my lovely hubby finally did the Padi diving course and thoroughly enjoyed himself even though it was hard going at times!!!

This week I have created a canvas for Bubbly Scrumptious that is to be given as a christening present.005

I have to say its just the most gorgeous baby pic so it was quite easy to create a piece of art around it :D

I painted the canvas with acrylic paint applied with a baby wipe - this is the first time I have tried painting like this and I love the effect. Its much softer than using a brush or a sponge and you can create nice swirly patterns in the paint.

When it was dry I inked the edges with frayed burlap distress ink.

I sanded the piece of die cut paper to soften the colour then ripped a couple of holes in to it. I curledthe edges back and inked with the distress ink, then stuck patches of scrap paper behind.

I highlighted the edges of the canvas and paperwith inka gold in old silver

015

I stuck it down overlapping
the edge of the canvas to create a 3d effect rather than just covering the front of the canvas.017

I used Fancy Pants stamps and coffee archival ink to create swirls on the corners making sure itwent over the patterend paper to create depth.

008

I painted Ranger rock candy cracklepaint to one corner and blasted with my heatgun to create some texture,then inked with the archival ink pad.


009

I then added lace and flowers and spritzed with cosmic shimmer mist in copper.

I added prima canvas letters and a few buttons along with a mix of flowers to finish off.


Hope you like it and also the recipient,

Hugs'n'snogs

Julie xx

Friday, 1 October 2010

A canvas wall hanging.......


created for Octobers Vanilla Sugar project :DI started by painting the canvas with a cream acrylic paint as a base.
I then mixed a spritz of Victoran distress re-inker with water and sprayed around the edges and through a prima mask on to the front of the canvas.
I then sponged on the inka gold in graphite through the mask with a sponge and continued round the edges of the canvas.
Next I sponged on some versamark ink in the top corner and sprinkled on some utee, which I then heated. I love texture on my work, and this gives a lovely glossy raised area on the canvas
I cut out the images from Graphic 45 Le Romantique and glued them down then highlighted with rock candy distress stickles, carefully smeared on (NOT!!!! LOL)
I spritzed some gorgeous Prima flowers with the ink then stuck them down with glossy accents.
I added some lace, TimHoltz ticket and memo pin and a metal butterfly from my stash.
I stamped and inked the edges with coffee archival ink.


Hope you like my project,
Hugs'n'snogs,
Julie xx

Wednesday, 3 March 2010

Christening canvas


This is my present for my gorgeous great nephew Reece who is being christened today :D
Its based on one of my LO's my niece spotted of him on Facebook and loved LOL


How gorgeous is the sparkle on the Rock Candy Stickles I used on the pic above - frayed burlap distress stickle on the photo itself :D

I painted the canvas with cashmere acrylic paint then inked the edges with Frayed Burlap distress ink, I used Rock Candy distress crackle paint on the corners but it didn't really have much effect on the canvas.

I stamped the Fancy Pants design with the Frayed burlap too, then used the same ink and broken china on the Prima paintable paper.
I used my distresser on the edges and inked those too.

The photo mat is coredinations cardstock which I sanded back and inked.
Added lots of primas and some braid and grunged with ink and frayed burlap distress stickles.
I ripped a piece of pizza box for the title mat and tore offmostof the top layer, then inked.
My chipboard alpha was white so I inked that too and added a little bit of pearl paint dabber and distress stickles.

Found a couple of nice things for you to play with :D

Look at the fabby new online catalogue from PaperArtsy :o how lush are all of those stamps :D

I have also discovered these fab free vintage downloads on the Craft Stamper website:D


Hugs'n'snogs,
J xx