Showing posts with label Simon says stamp and show. Show all posts

Tuesday, 26 April 2011

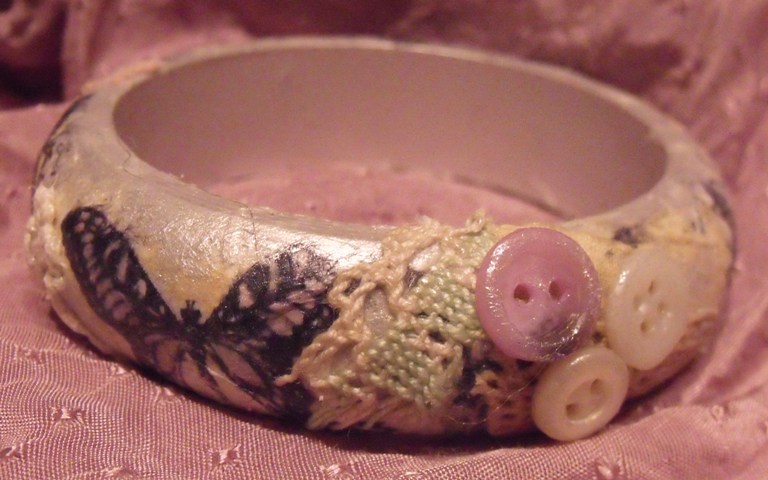
Made of wood............a bangle :D


Well there isn't long left to enter the Happy Daze facebook challenge which is currently "made with wood"

I used one of THESE fabby bangles as my wooden base :D

I coloured it first of all with inka gold in Platinum.
I stamped my butterflies on to fibre paper with archival ink, ripped the edges away to the size needed to cover the bangle leaving frayed edges, then stuck on to the bangle with a glue stick.
When dry I coloured it with promarkers and then brushed on more of the inka gold.
When dry and buffed I glued on the lace and buttons with Claudine Hellmuths matte medium andcoated the rest of the bangle - this is amazing as it just doesn't budge when dry and selals the stamped images.
When totally dry I highlighted areas again with the inka gold.


I am also going to add this to the Simon says stamp and show challenge this week which is to show some buttons .............. buttons??? did someone say buttons :D
no challenge for me this week really LOL :D

hugs'n'snogs,

Julie xx

Wednesday, 3 November 2010

I'm back!!!!!

Hola :D

I am back from the Domincan Republic minus a bit of blood thanks to lots of mozzies feeding on me :( which resulted in a visit to the hospital!!!

We still had a good time though and my lovely hubby finally did the Padi diving course and thoroughly enjoyed himself even though it was hard going at times!!!

This week I have created a canvas for Bubbly Scrumptious that is to be given as a christening present.005

I have to say its just the most gorgeous baby pic so it was quite easy to create a piece of art around it :D

I painted the canvas with acrylic paint applied with a baby wipe - this is the first time I have tried painting like this and I love the effect. Its much softer than using a brush or a sponge and you can create nice swirly patterns in the paint.

When it was dry I inked the edges with frayed burlap distress ink.

I sanded the piece of die cut paper to soften the colour then ripped a couple of holes in to it. I curledthe edges back and inked with the distress ink, then stuck patches of scrap paper behind.

I highlighted the edges of the canvas and paperwith inka gold in old silver

015

I stuck it down overlapping
the edge of the canvas to create a 3d effect rather than just covering the front of the canvas.017

I used Fancy Pants stamps and coffee archival ink to create swirls on the corners making sure itwent over the patterend paper to create depth.

008

I painted Ranger rock candy cracklepaint to one corner and blasted with my heatgun to create some texture,then inked with the archival ink pad.


009

I then added lace and flowers and spritzed with cosmic shimmer mist in copper.

I added prima canvas letters and a few buttons along with a mix of flowers to finish off.


Hope you like it and also the recipient,

Hugs'n'snogs

Julie xx

Thursday, 2 September 2010

Memories of Annalee

001


This is a dual purpose project today :D

Its this weeks Bubbly Scrumptious project plus I used lots of layering to comply with the Simon says stamp and show challenge this week - two birds with one stone LOL :D

Some of you may not know this but.......... I have a Prima Obsession!!!!

So how over the moon was I when Caroline sent me some of the gorgeous new Annalee range :D

Combine that with a page from a Maya Road Chipboard skinny house and this is what you get :D

First I covered a Bubbalicious chip key with the pink paper from the 6x6 paper pad.

I then covered the house in the blue paper with the floral corners and cut out the other floral corner to layer over the top to add dimension.

Before I did this, I stamped the fairy flora girl in black archival ink by sweeping it over the stamp rather than dabbing to give softer image. I then used a light blue promarker to highlight the shadows on the stamped image.

I then added the floral corner on 3D foam pads.

I cut out a roof from chipboard to match the one on the house then covered it with one of the borders from the paper pad. I raised this even further by sticking it down with 3D foam pads.

I covered a chipboard heart and tag and stamped them with prima stamps

Next I added some Prima craftables flowers and added centres with Viva decor paper pen in cobalt blue and added few of the crystals from the Prima mini stamp packs.

I decided my key looked a bit plain so stamped it with the swiping of ink randomly with the stamps I had already used

Lastly I punched holes in the roof and the key and threaded through ribbon to suspend it, the added a piece of lace to the key to form a hanging loop.

I adore the prima mini stamps and find them really useful in my altered dominoes and they are just such flipping good value!!!

Here's a few more pics for you to see before you dash off and buy those fabby stamps and papers :D

006

008

005

Hugs'n'snogs,

Julie xx