Showing posts with label altered items. Show all posts

Friday, 23 August 2013

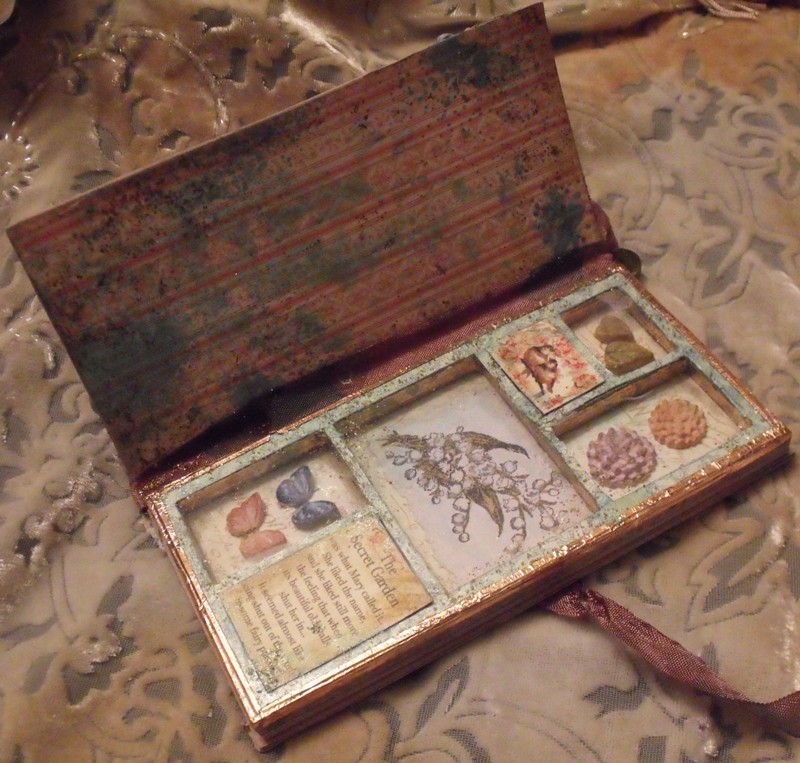
Secret Garden Specimen box for That's Crafty


What's the secret???
Open it up to find gorgeous garden finds :D
I have used Graphic 45 Secret Garden stamps and papers on a Tando covered printers tray to create this pretty vintage style specimen box.

For all the deets visit the That's Crafty blog HERE and to go shopping visit the site HERE :D

here's a close up of the inside ....


Hugs'n'snogs,
Julie xx


Sunday, 12 May 2013

Beadsmith Macrame board.... new toy review!!!


Ok, you might think  "I would never use this - I don't make jewellery..."
BUT if you want to do any type of weaving work I highly recommend this item.
Its made from a really sturdy memory foam with notches all round the edges.
It might seem a very basic tool, but its perfect for the job it does!!!

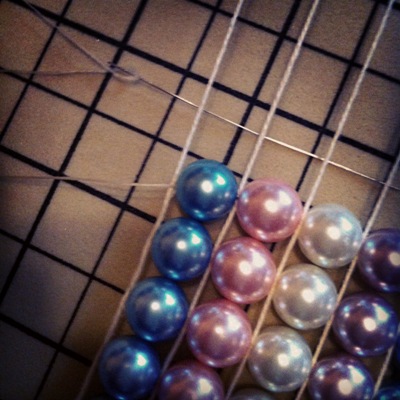
I tried to do the pearl bead weaving I have on my board on a small bead loom, it was incredibly difficult and nowhere near as neat as it has turned out on the macrame board.

I also made this bracelet from lace and fabric scraps on my beadloom - it would have been sooooo much easier on this board, believe me!!!
Bead weaving is really easy and could be used with some awesome items in your mixed media work, nice fibres, beads, buttons, lace, fabric scraps spring to mind for me...and they don't have to be uniform!!

I wanted to make a thick choker necklace with my pearls and was quite disappointed with how it turned out, so when my macrame board came I took it apart and have remade it - quick and easy!!

To bead weave you start with an extra downward thread (lazy thread) to the amount of beads you are using - I have used 5 beads wide, so have 6 lazy threads.
To make the beading easier I put my bobbin from my original bead loom under the threads near the bottom so that the beads had room to move under my lazy threads. You could use anything really, even a marker pen - just something to lift them from the board.

I attached my beading thread to the outer lazy thread and passed my needle underneath all of the lazy threads. I then threaded my 5 beads on, and spaced them in between the lazy threads.


I took my beading thread around the outer lazy thread, then passed the needle back through the beads over the top of the lazy threads.

Then repeat the whole weaving process.

I love the board because of the notches, you can take all your excess threads and secure them on the sides, and even keep your thread secure if you need to leave your work.

Because it is memory form you can safely stick pins in to it, or your needles.  

I got mine from the Jewellery Maker shopping channel but I'm sure you will be able to pick them up in beading shops too.

My beading is nice and straight because I have used beads all the same size but can you imagine the texture you can create with random items and threads - paper beads, shells, bakers twine....
Hope this is helpful to you all,
Let your imagination run riot!!!

Hugs'n'snogs,

Julie xx

edited to add... This is not difficult at all - incredibly easy, and incredibly quick if you use large beads like I did :D

Saturday, 4 May 2013

Forget me not...

 
As soon as I saw the Graphic 45 Secret Garden I had yo have it...I'm sure it was made just for me LOL
Its just so pretty and vintage and floral (and the amazing Diane Schultz follows me on Pinterest and often repins my pins ;-) )

I reluctantly cut in to my 8x8 pad to make this project - I have to admit it was cut very carefully and sparingly to maximise its use (...my precious...LOL)

I decided to finally use the giant peg I got from Happy Daze, which I had already sprayed purple with cosmic shimmer agggggeesssss ago - it was a failed Halloween project (never throw anything away!!!)

So to start with I covered the front panels with my paper, sanded and inked the edges lightly and added lace, buttons, seam binding ribbon and distress stickles in Victorian Velvet.All the pieces were glued down with Claudine's Matte Medium.


The frame is some chipboard shapes I already had and matched the panels in the G45 paper perfectly (which was a happy accident rather than planned LOL)
I used Inka gold on all the edges then covered with the paper, sanded and lightly inked with Frayed Burlap.

I decided to make a little blackboard on one side of the frame with some self adhesive black board material I had picked up in The Works ages ago, so stuck it on a piece of plain chipboard.


I covered the other side in the patterned paper with a little bit of layering and tearing to age it, then cut out the panel from the paper pad and glued on.
I added my Forget me not message with Tiny type clear stickers and  highlighted with blobs of glossy accents.

I added some lace to the reverse of one of my frames around the edge then  glued the sandwich together with glossy accents, which dries quickly and really holds the chipboard nicely - just don't get it on your pp.

I glued on the buttons and Prima flowers but it just didn't look finished, so I made some holes with my trusty pokey tool and embroidered through the sandwiched frame.

 The cross stitch looked pants on the reverse side so I covered a chippy heart and glued over the yucky stitching ;-)


The little dangly is a scrap piece of chippy covered in paper and die cut with a sizzix jewellery die with buttons added on jump rings.

To finish it off I added more distress stickles and rock candy stickles because I just have too add sparkle (it's the inner magpie in me ;-) ).

So now I have a cute little memo Blackboard that I can write my important messages on, that looks really pretty just sat on my desk :D

Oooo it felt really good getting inky and stickled again after all this time!!
Watch this space ;-)

Hugs'n'snogs,

Julie xx


Friday, 25 January 2013

Birdie faux bell jar for Happy Daze

 
Happy New year everyone - better late than never huh :D
The theme over on the Happy Daze blog this month is recycling because I'm sure we all need to be a little bit thrifty after the season of goodwill and long pay months LOL :D

My project is something I have been wanting to do for a very long time but was struggling to find a cloche or bell jar - they have been increasingly popular since TH released his sizzix die, and impossible to find at a reasonable price! (thanks T!m LOL :D )

I found a very clever idea on Pinterest showing a pop bottle transformed in to a bell jar from THIS BLOG so thought I would give it a go.
I am a Pinterest addict by the way, so if you want to follow me or any of my boards click the button on the side bar :D

I have to say its not very easy sawing the top of the bottle off without crushing the rest of the bottle, so after a couple of attempts I enlisted my hubby's help. he found it easier to leave the top on but remove the seal ring, then hold the bottle by the top to saw. Tricky, but he managed it one attempt, and found it pretty funny that the top of a coke bottle was so precious to me LOL :D

The base was made from a ribbon spool from my Christmas wrapping, an old cd and the back of my Tim Holtz paper pad, which I covered with Graphic 45 paper, acrylic paint, and TH crackle paint in Frayed Burlap.
I then tied a piece of ripped Tilda fabric around, glued on some lace and spritzed everything randomly with a distress re-inker mist to age it all.

I painted one of these cute little wooden houses stuck on a mini wooden bobbin in acrylic paint then added paper accents to the roof and back. I stamped the black paper before I stuck it down, with my Picket Fence distress marker to give a chalkboard effect.

I inked the edges with distress ink and gave it all a spritz with the ink mist. The piece of fabric tied around the bobbin was a leftover stamped from a previous project which says May you love... so I pinned on a TH muse token which says FOR EVER MORE.

I added buttons, bling and flowers, and a mini bird nest, and a teeny bird I bought from a florist supplier on e-bay.
I spritzed again with the ink mist and added some distress stickles randomly.


For the bell jar I added a game spinner and a  time piece to a curio knob with the screw and glued them on to the cut off top of the bottle.

Then glued on some lace which also got spritzed with the ink mist. I added distress stickles to the outside of the bottle around the top and bottom and just to make the bottle look more aged I sponged on some brown alcohol inks on the inside of the bottle.
I just placed it over the birdhouse and Voila, a cute recycled project :D


Who would have thought it had started life as a pop bottle, cd, packaging and a ribbon spool???

Pop on over to the Happy Daze blog to see other fabby projects and enter this months comp while you are there - not long left to enter so get recycling quick :D

Hugs'n'snogs,
Julie xx


Thursday, 23 August 2012

Love all the days jar for Happy Daze

The Happy Daze current monthly challenge is, inspired by the Olympic rings, so I thought I would alter a cute round glass jar I picked up in Matalan for just £2!!

I used this amazing Paperbag Studios stamp on to kraft cardstock with black archival ink.
The sentiment reads "May you love... all the days of your life" - I stamped the first part on to a scrap of Tilda fabric, then glued it over the stamped image and highlighted with a TH fragment.
I used Picket Fence distress stain and distress marker to grunge it up a little and highlight areas, then added distress stickles and glossy accents to highlight the words.

The lace was stained with a spritz of distress reinker in a mister with water and the TH foliage was coloured with TH distress embossing powders.and I added a small piece of tissue tape coloured with distress stain.
The lid of the jar was coloured with Viva decor Inka gold, alchol inks in willow, pink sherbert and snowcap mixative, then splodged with distress stickles, I then added some fabric, buttons and a Philosophy tag.
I then added some lace and an TH adage ticket to the base in a memo pin.

The lace around the top was also coloured with the distress reinker and distress stickled.
I added some fabric and buttons in to the bottom of the jar, glue a piece of lace to the back of the jar, then added the stamped image.

Pretty cute huh :D
Hugs'n'snogs,
Julie xx                                                                                                                 

Saturday, 18 August 2012

Sweet dreams are made of this.... **pic heavy post!!

I finally finished my Victoriana/shabby chic dream catcher and I'm sooooo in love with it:D
I used bits and pieces from all over including ebay, Happy Daze, my local craft shop Crafty Workshop (where I bought the beautiful Tilda fabrics I used through out the project :D The moon face is from Graphics Fairy.
I used a lot of Claudines sticky back canvas, and multi matte medium throughout this project, and lots of beads, buttons and objects I have gathered over time :D
Ok, I will just show you the pics...


I think I might have sweet dreams tonight :D

Hugs'n'snogs,
Julie xx

Thursday, 28 June 2012

Frozen Dragonfly for Happy Daze


Well there isn't long left to enter the June Happy Daze challenge so if you want to be in with a chance of winning a £15 gift voucher upload your JUNE BUGS HERE!!!

I decided to try a little bit of assemblage for this cutie dragonfly piece featuring THESE fab wooden spools and the large TH FRACTURED DOLL which is a repro frozen charlotte doll, which is why I called this piece frozen dragonfly :D

I started by selecting graduating sized buttons in various vintage colours (big -or bug surprise LOL!!!), a few beads and some art wire.

I cut a long piece of wire and folded it in half then threaded on my beads, buttons and spools giving the wire an occasional twist to make the shape more flexible.

The ends of the wire made the anttenea by twisting around a pokey tool and adding beads to the ends.

I made the wings by threading the art wire through a cheap lace doiley I bought on ebay, in wing shapes then cutting roughly around the outer edge.
I left enough spare wire to wrap around the main spool so that the wings were secure.
I then wrapped more wire round the fractured doll and added ribbon and lace to the spools.

I coloured the wings by dabbing on versamark ink randomly then used  FRANTAGE embossing powders over the top of it, I heated it gently as the doiley was made of nylon and I didn't want to burn it.

I added a few embellies including more buttons and some ideaology and to finish off I spritzed the whole piece with a spray made from distress re-inker in victorian velvet, then added a splodge or two of distress stickles in bundled sage.

 Here's a few more piccies :D


This is going to look so pretty in my bedroom :D

Hugs'n'snogs,
Julie xx