Friday, 19 July 2013

Blooming wire work..

.. I am definitely a novice when it comes to jewellery wire working but I was so inspired by a demo by Karon Crawford on the Jewellery Maker shopping channel today that I created this necklace.

All the semi precious beads and findings were purchased from there and are fabby quality and sooooo pretty :D
I am in love with the faceted shell pearls!!


I can't wait to wear this piece :D
It was so nice sitting in my yarden creating this necklace today :D

hugs'n'snogs,

Julie xx

Tuesday, 25 June 2013

Sad news....


I am very sad to say that Happy Daze is closing :-(
Moira has launched a 40% off sale featured on THIS blog post

Happy Daze was my first DT position and I still remember the day I received the e-mail inviting me to join, it was such a surprise!! :D

Moira has been a fantastic inspiration, and an even better friend :D
We have shared some amazing experiences which i will never forget.
So a HUGE thank you to Moira for kick starting my DT positions and hope that your health improves.

So if you want to grab a bargain while Moira closes up the shop hop on over HERE to save 40% off throughout the whole shop.

hugs'n'very sad snogs,
Julie xx

Monday, 17 June 2013

Mary, Mary, quite contrary, how does your garden grow???

Well my name isn't Mary, and I may be quite contrary (my Mum defo says I am!! ) but I don't have a garden :-(

I do however have a long narrow yard....so I created myself a Yarden :D
I have been rather stressed of late and have found creating my own little space very relaxing...I have made it so there is only room for one chair LOL :D

So I couldn't have anything boring when it was somewhere I wanted to chillax, it had to be me....and this is soooooooo me :D
I don't have silver bells and cockle shells, I have blue ribbons and pink buttons, and a bit of bling for good measure LOL :D

Ok so here is my tea party inspired yarden ...


Purdey huh :D
And my ribbons and bunting not only look pretty they keep the birds away...that's what I tell myself anyway :D
My niece said to me "but your bunting will get wet...", I really don't mind, I can't wait until it all looks weathered and aged :D

Now for a tale of woe :-(

I was so happy with the way my beautiful forget-me-nots that I bought in some totally bargain bin sale/dying packs from B&Q had settled in and bloomed :D Just the perfect thing for my vintage style :D

Then I got up a few days later to find them like this....
Both plants were the same and in different places!!!

I was baffled...had somebody been in my Yarden and cut all my pretty blooms off?
Was it the birds?
Had an animal paid me a visit and scoffed them??

Well... I needed to look a little bit closer to home.... after doing a bit of Gillian Mckeith style investigation I discovered the culprits were my naughty pooches!!!

When I took this picture I thought Ollie was admiring my progress.... nooooooo... he was checking what he and Rolo were going to have for supper !!!
Naughty pooches!!! :-(

I now have some spray to try and deter them and sprinkle the plants with pepper to try and keep them munching my pretties!!
If you have any tips please share :D

hugs'n'snogs,

Julie xx


Sunday, 12 May 2013

Beadsmith Macrame board.... new toy review!!!


Ok, you might think  "I would never use this - I don't make jewellery..."
BUT if you want to do any type of weaving work I highly recommend this item.
Its made from a really sturdy memory foam with notches all round the edges.
It might seem a very basic tool, but its perfect for the job it does!!!

I tried to do the pearl bead weaving I have on my board on a small bead loom, it was incredibly difficult and nowhere near as neat as it has turned out on the macrame board.

I also made this bracelet from lace and fabric scraps on my beadloom - it would have been sooooo much easier on this board, believe me!!!
Bead weaving is really easy and could be used with some awesome items in your mixed media work, nice fibres, beads, buttons, lace, fabric scraps spring to mind for me...and they don't have to be uniform!!

I wanted to make a thick choker necklace with my pearls and was quite disappointed with how it turned out, so when my macrame board came I took it apart and have remade it - quick and easy!!

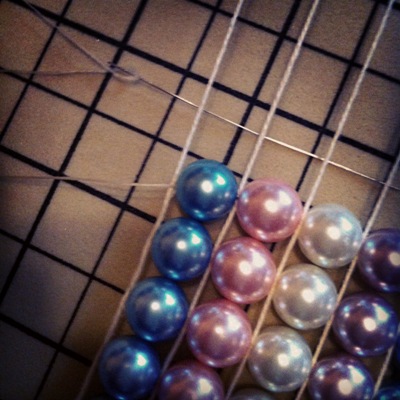
To bead weave you start with an extra downward thread (lazy thread) to the amount of beads you are using - I have used 5 beads wide, so have 6 lazy threads.
To make the beading easier I put my bobbin from my original bead loom under the threads near the bottom so that the beads had room to move under my lazy threads. You could use anything really, even a marker pen - just something to lift them from the board.

I attached my beading thread to the outer lazy thread and passed my needle underneath all of the lazy threads. I then threaded my 5 beads on, and spaced them in between the lazy threads.


I took my beading thread around the outer lazy thread, then passed the needle back through the beads over the top of the lazy threads.

Then repeat the whole weaving process.

I love the board because of the notches, you can take all your excess threads and secure them on the sides, and even keep your thread secure if you need to leave your work.

Because it is memory form you can safely stick pins in to it, or your needles.  

I got mine from the Jewellery Maker shopping channel but I'm sure you will be able to pick them up in beading shops too.

My beading is nice and straight because I have used beads all the same size but can you imagine the texture you can create with random items and threads - paper beads, shells, bakers twine....
Hope this is helpful to you all,
Let your imagination run riot!!!

Hugs'n'snogs,

Julie xx

edited to add... This is not difficult at all - incredibly easy, and incredibly quick if you use large beads like I did :D

Sunday, 5 May 2013

Sew cool :D


I spotted this On GillyB's blog and had to snaffle it for mine too :D
Isn't she fabby :D

J xx

Saturday, 4 May 2013

Forget me not...

 
As soon as I saw the Graphic 45 Secret Garden I had yo have it...I'm sure it was made just for me LOL
Its just so pretty and vintage and floral (and the amazing Diane Schultz follows me on Pinterest and often repins my pins ;-) )

I reluctantly cut in to my 8x8 pad to make this project - I have to admit it was cut very carefully and sparingly to maximise its use (...my precious...LOL)

I decided to finally use the giant peg I got from Happy Daze, which I had already sprayed purple with cosmic shimmer agggggeesssss ago - it was a failed Halloween project (never throw anything away!!!)

So to start with I covered the front panels with my paper, sanded and inked the edges lightly and added lace, buttons, seam binding ribbon and distress stickles in Victorian Velvet.All the pieces were glued down with Claudine's Matte Medium.


The frame is some chipboard shapes I already had and matched the panels in the G45 paper perfectly (which was a happy accident rather than planned LOL)
I used Inka gold on all the edges then covered with the paper, sanded and lightly inked with Frayed Burlap.

I decided to make a little blackboard on one side of the frame with some self adhesive black board material I had picked up in The Works ages ago, so stuck it on a piece of plain chipboard.


I covered the other side in the patterned paper with a little bit of layering and tearing to age it, then cut out the panel from the paper pad and glued on.
I added my Forget me not message with Tiny type clear stickers and  highlighted with blobs of glossy accents.

I added some lace to the reverse of one of my frames around the edge then  glued the sandwich together with glossy accents, which dries quickly and really holds the chipboard nicely - just don't get it on your pp.

I glued on the buttons and Prima flowers but it just didn't look finished, so I made some holes with my trusty pokey tool and embroidered through the sandwiched frame.

 The cross stitch looked pants on the reverse side so I covered a chippy heart and glued over the yucky stitching ;-)


The little dangly is a scrap piece of chippy covered in paper and die cut with a sizzix jewellery die with buttons added on jump rings.

To finish it off I added more distress stickles and rock candy stickles because I just have too add sparkle (it's the inner magpie in me ;-) ).

So now I have a cute little memo Blackboard that I can write my important messages on, that looks really pretty just sat on my desk :D

Oooo it felt really good getting inky and stickled again after all this time!!
Watch this space ;-)

Hugs'n'snogs,

Julie xx


Wednesday, 10 April 2013

Textured grid-blocks...lightbulb moment :D


 Do you ever have moments where you think......why didn't I think of that sooner???

Well I found some acrylic tearing templates I bought years and years ago and thought they could work as diffusers with my texture plates???

I still haven't tried them yet because I suddenly had a light bulb moment!!
I thought about using my grid-blocks - I have some of the collage and word type texture fades and had the idea of just using a single word or item from the folder!!

But then also discovered it was quite nice to just emboss random sections.
The embossing only happens around the area the grid-block is placed.

These are my first attempts and defo not perfect  but have possibilities ;-)

I taped the blocks in place and used my base plate and a cutting plate on top of the embossing folder - this way you can place the block wherever you want :D

Here's some piccis of my experimenting....


I think there are more possibilities here, I just need to do a bit more exploration :D

These aren't my normal choice of colours as you know, but I thought they would stand out well in my photos :D

Hugs'n'snogs,

Julie xx
Just a quick edit to add, after watching a tv demo on a similar vein they used the cutting plate at the bottom then the folder and the block on top  which gave a much crisper outline. I will try that next time ;-)


Monday, 4 February 2013

Ellie's canvas...


 Morning everyone, thought I would share the canvas I decorated for my great niece Ellie's christening yesterday.
I had thought about giving a different gift, but having spoken to Ellie's mum she would have been devastated if I hadn't given her a canvas to go with Reece's LOL

To be fair, its hard to go wrong with such a cute pic isn't it LOL :D fairy babes are my fave :D

I started by painting the canvas with 3 different colours of acrylic paint wiped on with a dry baby wipe. i love the way they blend and you don't have such a heavy coat when applied like this.
I searched through my scrapbook papers until I found the perfect combo, I think the shaped piece is Penny Lane by MME and the floral print is out of a baby girl paper stack - possibly DCWV but the front cover was missing LOL. The piece under the name was a very old piece left over from an old project when I first bought my cricut, which just so happened to be perfect for this project :D

They were single sided papers and I didn't really want white edges on my torn paper, so I inked the back first to colour them before distressing them with my TH distresser and more ink :D

The lace is coloured with distress reinker in a mister, then glued on with Claudine's matte medium.

The pretty flowers were a spray I picked up in Dunelm Mill when I bought the canvas and work so well with the colour scheme.


The photo was printed on to canvas photo paper and I tinted the black area with a little acrylic paint just rubbed on so it was light.
I used rock candy distress stickles on the wings and when dry I highlighted the details on the photo with a clear Sakura glitter pen.
Ellie was wearing a flower headband in the photo so I emphasised this by gluing on little paper flowers, 

I used Fancy Pants and Prima stamps with my Victorian Velvet ink pad which I also highlighted with the Sakura pen.

The letters are gorgeous Pink paislee mistables spritzed with Victorian velvet again.

when everything was dry I added lots of distress stickles randomly and to age the lace etc...
Everything was finished off with a spritz of frayed burlap distress reinker in Frayed burlap.

I hope they like it :D

Julie xx


Friday, 25 January 2013

Birdie faux bell jar for Happy Daze

 
Happy New year everyone - better late than never huh :D
The theme over on the Happy Daze blog this month is recycling because I'm sure we all need to be a little bit thrifty after the season of goodwill and long pay months LOL :D

My project is something I have been wanting to do for a very long time but was struggling to find a cloche or bell jar - they have been increasingly popular since TH released his sizzix die, and impossible to find at a reasonable price! (thanks T!m LOL :D )

I found a very clever idea on Pinterest showing a pop bottle transformed in to a bell jar from THIS BLOG so thought I would give it a go.
I am a Pinterest addict by the way, so if you want to follow me or any of my boards click the button on the side bar :D

I have to say its not very easy sawing the top of the bottle off without crushing the rest of the bottle, so after a couple of attempts I enlisted my hubby's help. he found it easier to leave the top on but remove the seal ring, then hold the bottle by the top to saw. Tricky, but he managed it one attempt, and found it pretty funny that the top of a coke bottle was so precious to me LOL :D

The base was made from a ribbon spool from my Christmas wrapping, an old cd and the back of my Tim Holtz paper pad, which I covered with Graphic 45 paper, acrylic paint, and TH crackle paint in Frayed Burlap.
I then tied a piece of ripped Tilda fabric around, glued on some lace and spritzed everything randomly with a distress re-inker mist to age it all.

I painted one of these cute little wooden houses stuck on a mini wooden bobbin in acrylic paint then added paper accents to the roof and back. I stamped the black paper before I stuck it down, with my Picket Fence distress marker to give a chalkboard effect.

I inked the edges with distress ink and gave it all a spritz with the ink mist. The piece of fabric tied around the bobbin was a leftover stamped from a previous project which says May you love... so I pinned on a TH muse token which says FOR EVER MORE.

I added buttons, bling and flowers, and a mini bird nest, and a teeny bird I bought from a florist supplier on e-bay.
I spritzed again with the ink mist and added some distress stickles randomly.


For the bell jar I added a game spinner and a  time piece to a curio knob with the screw and glued them on to the cut off top of the bottle.

Then glued on some lace which also got spritzed with the ink mist. I added distress stickles to the outside of the bottle around the top and bottom and just to make the bottle look more aged I sponged on some brown alcohol inks on the inside of the bottle.
I just placed it over the birdhouse and Voila, a cute recycled project :D


Who would have thought it had started life as a pop bottle, cd, packaging and a ribbon spool???

Pop on over to the Happy Daze blog to see other fabby projects and enter this months comp while you are there - not long left to enter so get recycling quick :D

Hugs'n'snogs,
Julie xx