Showing posts with label Tim Holtz. Show all posts

Thursday, 4 July 2019

The page that got away... almost!!!


The page that got away has found its purpose 😊


So it was already painted green and totally dry seeing as it has sat under a pile of clutter on my desk since feb lol.

I had lots of chipboard shapes and left over bits from my art journal kit so I started by sticking all but the butterfly down and painted them the same colour.


I then glued on lots of little glass beads, microbeads and some gems i found in my stash and gave the whole thing a blitz with picket fence distress spray.

It was all sprinkled with 13arts rainbow colours and misted... be very sparing with these.... that pigment is super strong and comes through other layers lol...
To knock it back again i added more distress spray and heat dried it so it stopped wicking.


The butterfly was painted with pink acrylic paint and I dug out a really old tub of TH crackle paint... well it’s more like paste now its that old!!!

When it was dry I added a little bit more colour with my inktense pencils, added some shadows with a bit of black soot distress ink and my waterbrush, and highlighted some of the edges with my white posca.


The body of the butterfly isa pencil from that well known Swedish home decor place .
When everything was dry I added a touch of rock candy distress stickles (do they still make this??? Its my absolute fave and my bottle is nearly empty!!!)
And finished off with a splash of white posca pen.


Not bad for left overs eh lol 😊

Hugs’n’snogs,
J xx


Wednesday, 16 January 2019

Soooo....

As you can see I have been playing about and getting covered in paint and ink lately.
Just finding my feet with new techniques and products.

Sooooo ... Imagine my surprise when Caroline at Bubblyfunk asked me to be a guest design team member for her new stencil range!!!
Of course I said yes .... hurrah... more pretty stencils to play with 😊

So the first of my projects should be on the blog here tomorrow!!!

Wanna sneaky peeky???
Go on then....
Hugs’n’snogs,

Julie xx

P.S... the Tim Holtz sizzix release is in the shop too!!!

Tuesday, 15 January 2019

2019...

So things have changed a lot since I last regularly blogged for me personally and in the crafting world
I have made a lovely new start in my life in a lovely new home (that has taken quite a lot of work to make it that way, and still a lot to do) 😊

But hurrah!!!!.... I have a craft room.... all my crafty things all in one place... eep... there is a lot more than I realised!!!!
To be fair it has taken a long time to collect (since teenage years... but us crafters are like that lol) a vast array of craft materials from sewing and knitting through to my current passion which is acrylic paints, inks, stencils and awesome new ranges of stamps.

My craft room is starting to take shape now and most things are unpacked, but there is still a lot to do to make it work.

So i’ve invested in quite a few amazng new things since I started my new crafting journey and a few of my fave things are my stamp platform, distress oxides and crayons, Aall & Create stamps and stencils, Jane Davenport stamps and books... i could go on lol

I thought I would do a quick share of a few projects I have completed over the last few months that i’m so happy with 😊
Although this may go horribly wrong because I can’t remember how to resize my pics lol 🤣🤣🤣
Please bare with me... I feel like a newbie again!!!

Hugs’n’snogs,
Julie


Friday, 23 August 2013

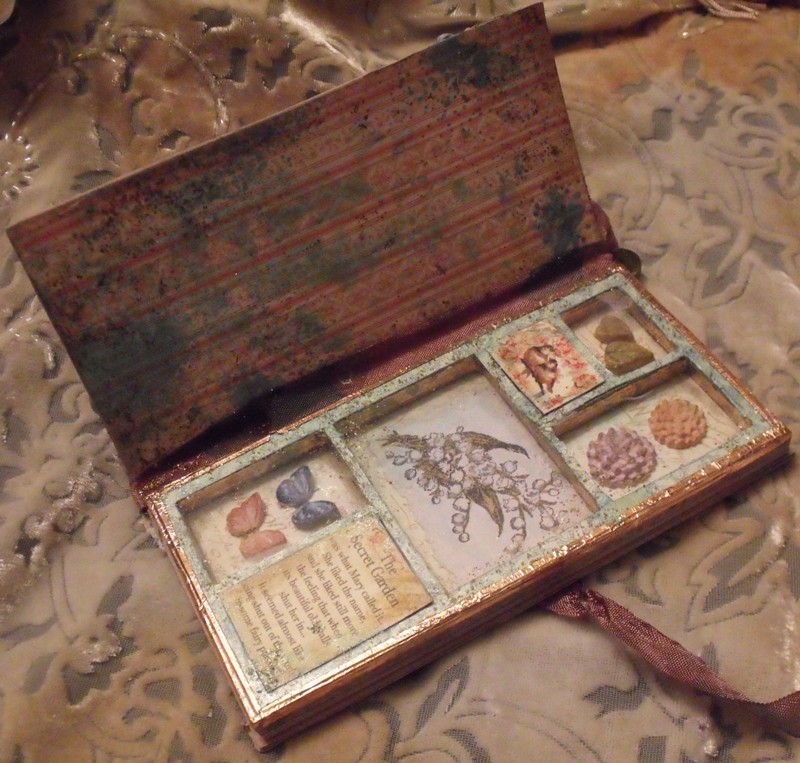
Secret Garden Specimen box for That's Crafty


What's the secret???
Open it up to find gorgeous garden finds :D
I have used Graphic 45 Secret Garden stamps and papers on a Tando covered printers tray to create this pretty vintage style specimen box.

For all the deets visit the That's Crafty blog HERE and to go shopping visit the site HERE :D

here's a close up of the inside ....


Hugs'n'snogs,
Julie xx


Saturday, 3 August 2013

How curious, Alice mobile for Thats Crafty

 That's me :D

Yes,  I am very honoured to be the guest designer for August on the That's Crafty blog :D
If you haven't been and visited the shop head on over HERE and see the amazing range of stamps and other crafting goodies in Laura's fab shop :D

This is my first piece using the lush Stampendous Alice stamps along with tando chippie yumminess :D


I had a terrible time trying to capture this at its best so will attempt to try and get some better pictures for you while I am on my weeks leave this week ;-)
For all the deets and how to visit the blog HERE and show me some support :D

I am rather out of practice at not only blogging but crafting these days!! But I intend to sort this out :D
I have some fabby Tando to play with, moulds and paper clay, and lots of yummy stamps :D

Watch this space,
hugs'n'snogs,

Julie xx

Wednesday, 10 April 2013

Textured grid-blocks...lightbulb moment :D


 Do you ever have moments where you think......why didn't I think of that sooner???

Well I found some acrylic tearing templates I bought years and years ago and thought they could work as diffusers with my texture plates???

I still haven't tried them yet because I suddenly had a light bulb moment!!
I thought about using my grid-blocks - I have some of the collage and word type texture fades and had the idea of just using a single word or item from the folder!!

But then also discovered it was quite nice to just emboss random sections.
The embossing only happens around the area the grid-block is placed.

These are my first attempts and defo not perfect  but have possibilities ;-)

I taped the blocks in place and used my base plate and a cutting plate on top of the embossing folder - this way you can place the block wherever you want :D

Here's some piccis of my experimenting....


I think there are more possibilities here, I just need to do a bit more exploration :D

These aren't my normal choice of colours as you know, but I thought they would stand out well in my photos :D

Hugs'n'snogs,

Julie xx
Just a quick edit to add, after watching a tv demo on a similar vein they used the cutting plate at the bottom then the folder and the block on top  which gave a much crisper outline. I will try that next time ;-)


Friday, 25 January 2013

Birdie faux bell jar for Happy Daze

 
Happy New year everyone - better late than never huh :D
The theme over on the Happy Daze blog this month is recycling because I'm sure we all need to be a little bit thrifty after the season of goodwill and long pay months LOL :D

My project is something I have been wanting to do for a very long time but was struggling to find a cloche or bell jar - they have been increasingly popular since TH released his sizzix die, and impossible to find at a reasonable price! (thanks T!m LOL :D )

I found a very clever idea on Pinterest showing a pop bottle transformed in to a bell jar from THIS BLOG so thought I would give it a go.
I am a Pinterest addict by the way, so if you want to follow me or any of my boards click the button on the side bar :D

I have to say its not very easy sawing the top of the bottle off without crushing the rest of the bottle, so after a couple of attempts I enlisted my hubby's help. he found it easier to leave the top on but remove the seal ring, then hold the bottle by the top to saw. Tricky, but he managed it one attempt, and found it pretty funny that the top of a coke bottle was so precious to me LOL :D

The base was made from a ribbon spool from my Christmas wrapping, an old cd and the back of my Tim Holtz paper pad, which I covered with Graphic 45 paper, acrylic paint, and TH crackle paint in Frayed Burlap.
I then tied a piece of ripped Tilda fabric around, glued on some lace and spritzed everything randomly with a distress re-inker mist to age it all.

I painted one of these cute little wooden houses stuck on a mini wooden bobbin in acrylic paint then added paper accents to the roof and back. I stamped the black paper before I stuck it down, with my Picket Fence distress marker to give a chalkboard effect.

I inked the edges with distress ink and gave it all a spritz with the ink mist. The piece of fabric tied around the bobbin was a leftover stamped from a previous project which says May you love... so I pinned on a TH muse token which says FOR EVER MORE.

I added buttons, bling and flowers, and a mini bird nest, and a teeny bird I bought from a florist supplier on e-bay.
I spritzed again with the ink mist and added some distress stickles randomly.


For the bell jar I added a game spinner and a  time piece to a curio knob with the screw and glued them on to the cut off top of the bottle.

Then glued on some lace which also got spritzed with the ink mist. I added distress stickles to the outside of the bottle around the top and bottom and just to make the bottle look more aged I sponged on some brown alcohol inks on the inside of the bottle.
I just placed it over the birdhouse and Voila, a cute recycled project :D


Who would have thought it had started life as a pop bottle, cd, packaging and a ribbon spool???

Pop on over to the Happy Daze blog to see other fabby projects and enter this months comp while you are there - not long left to enter so get recycling quick :D

Hugs'n'snogs,
Julie xx



Thursday, 23 August 2012

Love all the days jar for Happy Daze

The Happy Daze current monthly challenge is, inspired by the Olympic rings, so I thought I would alter a cute round glass jar I picked up in Matalan for just £2!!

I used this amazing Paperbag Studios stamp on to kraft cardstock with black archival ink.
The sentiment reads "May you love... all the days of your life" - I stamped the first part on to a scrap of Tilda fabric, then glued it over the stamped image and highlighted with a TH fragment.
I used Picket Fence distress stain and distress marker to grunge it up a little and highlight areas, then added distress stickles and glossy accents to highlight the words.

The lace was stained with a spritz of distress reinker in a mister with water and the TH foliage was coloured with TH distress embossing powders.and I added a small piece of tissue tape coloured with distress stain.
The lid of the jar was coloured with Viva decor Inka gold, alchol inks in willow, pink sherbert and snowcap mixative, then splodged with distress stickles, I then added some fabric, buttons and a Philosophy tag.
I then added some lace and an TH adage ticket to the base in a memo pin.

The lace around the top was also coloured with the distress reinker and distress stickled.
I added some fabric and buttons in to the bottom of the jar, glue a piece of lace to the back of the jar, then added the stamped image.

Pretty cute huh :D
Hugs'n'snogs,
Julie xx                                                                                                                 

Thursday, 28 June 2012

Frozen Dragonfly for Happy Daze


Well there isn't long left to enter the June Happy Daze challenge so if you want to be in with a chance of winning a £15 gift voucher upload your JUNE BUGS HERE!!!

I decided to try a little bit of assemblage for this cutie dragonfly piece featuring THESE fab wooden spools and the large TH FRACTURED DOLL which is a repro frozen charlotte doll, which is why I called this piece frozen dragonfly :D

I started by selecting graduating sized buttons in various vintage colours (big -or bug surprise LOL!!!), a few beads and some art wire.

I cut a long piece of wire and folded it in half then threaded on my beads, buttons and spools giving the wire an occasional twist to make the shape more flexible.

The ends of the wire made the anttenea by twisting around a pokey tool and adding beads to the ends.

I made the wings by threading the art wire through a cheap lace doiley I bought on ebay, in wing shapes then cutting roughly around the outer edge.
I left enough spare wire to wrap around the main spool so that the wings were secure.
I then wrapped more wire round the fractured doll and added ribbon and lace to the spools.

I coloured the wings by dabbing on versamark ink randomly then used  FRANTAGE embossing powders over the top of it, I heated it gently as the doiley was made of nylon and I didn't want to burn it.

I added a few embellies including more buttons and some ideaology and to finish off I spritzed the whole piece with a spray made from distress re-inker in victorian velvet, then added a splodge or two of distress stickles in bundled sage.

 Here's a few more piccies :D


This is going to look so pretty in my bedroom :D

Hugs'n'snogs,
Julie xx

Sunday, 29 April 2012

Daisy's christening canvas...

 
Well I am not one for repeating my work but I had a special request from my Niece who loved her babys christening canvas so much she wanted me to make another for her friends baby who is being christened today.
I couldn't make it exactly the same or it would have taken away the uniqueness of Emily's piece.

So as the little dimpled cutie is called Daisy I added some TH tattered floral daisys cut from the canvas to the corner.
I used the same techniques as I did for Emily's with the transfer technique, and used theese lush Prima masks on the corners.

here's a few close ups for you :D


Hugs'n'snogs,
Julie xx