Showing posts with label jewellery. Show all posts

Sunday, 22 June 2014

Totally Tropical Necklace

Foof...Fooooooffff....just blowing the cobwebs out of my long lost blog :D

I am creeping back in to my crafting...under the influence of JewelleryMaker.com!!!
Seriously.....what an inspirational shopping channel, that just gets better and better :D

I bought a kit last week with the red agate cala lily beads and orange, pink and blue quartz in it....they match perfectly the suedette cords I also bought there quite a while ago.

a simple design, but really striking with the lush coloured gemstones, which just happen to match one of my fave summer max dresses :D Win, win :D

hugs'n'snogs,
Julie xx

Friday, 24 January 2014

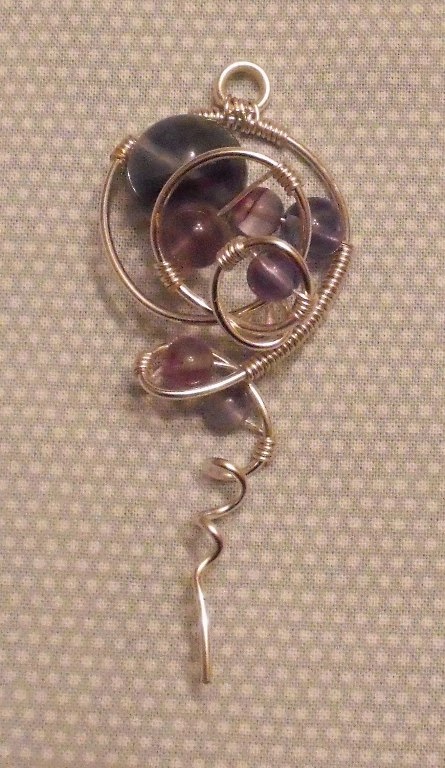
Wire wrapped Flourite

Well I haven't played with my wire, or any jewellery making supplies for a while and was determined to at least make one thing on my weeks holiday!

I'm pretty pleased with this wire wrapped pendant as it is smaller flourite beads I have used rather than one focal gem stone.

What I like most about this pendant is that its wearable both ways, has dimension and also movement :D


I made another pendant too, but I think that one might get deconstructed LOL

Anyway, at least I made one thing :D

Hugs'n'snogs,
Julie xx

Monday, 20 January 2014

Happy New Year!!!

Sorry I'm a bit late... but you know what I'm like LOL :D
well I come bearing news too....

I will be attending The Mad Hatters Tea Party on the 19th of April at Chill Out Community Centre - St Gregory's & St Patrick's School Esk Avenue, Mirehouse.
If you want to see what its all about visit the facebook page HERE

So guess who's going to be busy for a couple of months getting prepped?? ME lol :D

Hugs'n'snogs,
Julie xx

Thursday, 28 November 2013

It's almost time....

...for Minnie's Emporium!!!

So I have some pretty pendant watches ready to go with me....and yeah, I know all the times are different, but hey...that's how I roll LOL :D

So if you are out and about in Cumbria between 2pm and 6pm this weekend why not pay Minnie and me a visit at the Carnegie in Workington :D

Hope to see you there :D
Hugs'n'vintage snogs,
Julie xx

Sunday, 6 October 2013

Wirework Dragonfly....or is it????

is it really a wirework dragonfly???
Do you really think I got THAT good in just a few weeks??? LOL

Nooooooooooooooo - well would you believe it started as a crochet motif I bought from the auction site a while ago and it was white cotton?
Why does it look like silver wire??? Swellegant!

Christi Friesen's awesome metal paint transformed my pretty crochet piece in to an even more awesome addition to my wirework pendant!!

I added peridot chips and wire both from jewellery maker which is also a UK stockist of the swellegant products :D

I gave it all a coating of charcoal dyeoxide to tone down the brightness of the wire :D

Christi, I hope you love it too :D

I am working on a much bigger piece but just had to share this in the meantime :D
hugs'n'swellegant snogs,
Julie xx

Saturday, 14 September 2013

Wire wrapped pendants - again :D

I have been playing with wire and gems again :D
The moon shaped pendant is made with gold and silver coated copper wire with moonstone and shell stars

The wrapped stone is a gorgeous piece of blue chalcedony which is cut and polished on one side but rough (but smooth LOL) and textured on the other side,
The colour running through it is gorgeous and the sparkle on the rough side is sooooo pwitty :D
It is wrapped in copper wire with moonstone chips added.
Now what to hang them on???
They are fairly large pieces so would even make pretty suncatchers

Loving playing with wire :D

Hugs'n'snogs,
Julie xx

Sunday, 11 August 2013

Wire wrapped Amethyst pendant


I was so inspired watching The Rachel Norris masterclass on Jewellery Maker channel this week I finally manged to pluck up the courage to attempt a wire wrapped pendant.

It's defo not perfect, and I need practice, but I don't think its too bad for a first attempt LOL

I haven't decided what to string it on to yet so have just threaded it on to a piece of organza ribbon while I think about it :D

Here's a close up :D
I love those little faceted shell pearls along with the silver plated wire, they look so delicate :D

hugs'n'snogs,
Julie xx

Sunday, 12 May 2013

Beadsmith Macrame board.... new toy review!!!


Ok, you might think  "I would never use this - I don't make jewellery..."
BUT if you want to do any type of weaving work I highly recommend this item.
Its made from a really sturdy memory foam with notches all round the edges.
It might seem a very basic tool, but its perfect for the job it does!!!

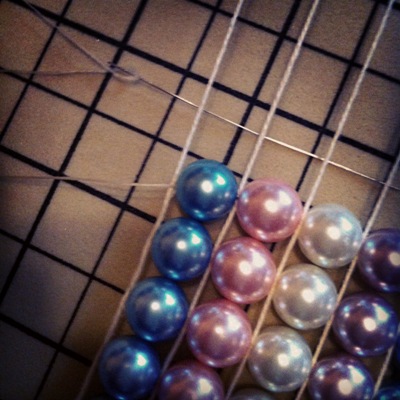
I tried to do the pearl bead weaving I have on my board on a small bead loom, it was incredibly difficult and nowhere near as neat as it has turned out on the macrame board.

I also made this bracelet from lace and fabric scraps on my beadloom - it would have been sooooo much easier on this board, believe me!!!
Bead weaving is really easy and could be used with some awesome items in your mixed media work, nice fibres, beads, buttons, lace, fabric scraps spring to mind for me...and they don't have to be uniform!!

I wanted to make a thick choker necklace with my pearls and was quite disappointed with how it turned out, so when my macrame board came I took it apart and have remade it - quick and easy!!

To bead weave you start with an extra downward thread (lazy thread) to the amount of beads you are using - I have used 5 beads wide, so have 6 lazy threads.
To make the beading easier I put my bobbin from my original bead loom under the threads near the bottom so that the beads had room to move under my lazy threads. You could use anything really, even a marker pen - just something to lift them from the board.

I attached my beading thread to the outer lazy thread and passed my needle underneath all of the lazy threads. I then threaded my 5 beads on, and spaced them in between the lazy threads.


I took my beading thread around the outer lazy thread, then passed the needle back through the beads over the top of the lazy threads.

Then repeat the whole weaving process.

I love the board because of the notches, you can take all your excess threads and secure them on the sides, and even keep your thread secure if you need to leave your work.

Because it is memory form you can safely stick pins in to it, or your needles.  

I got mine from the Jewellery Maker shopping channel but I'm sure you will be able to pick them up in beading shops too.

My beading is nice and straight because I have used beads all the same size but can you imagine the texture you can create with random items and threads - paper beads, shells, bakers twine....
Hope this is helpful to you all,
Let your imagination run riot!!!

Hugs'n'snogs,

Julie xx

edited to add... This is not difficult at all - incredibly easy, and incredibly quick if you use large beads like I did :D
Friday, 6 January 2012

Polymer clay pendants for Happy Daze


Hi everyone and Happy New Year :D
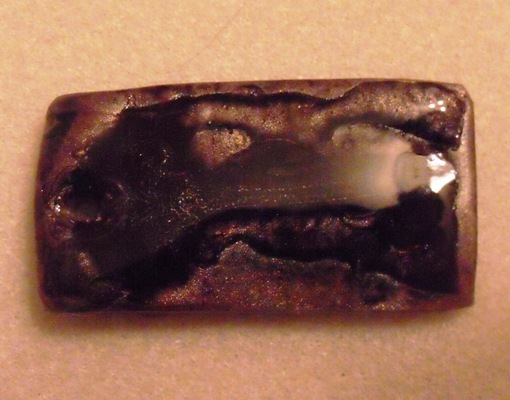
For my NEW technique this week I coloured white polymer clay using perfect pearls pigment powders.
I used white clay and manipulated it until it was nice and soft. I put my perfect pearls on a piece of clingfilm and squished the clay in to it, then neaded it in.
Polymer clay is much softer than it used to be so is much easier to get to a workable texture.

I added in some clear glitter to see how that would look baked, you can't really see it though on the front of the piece, but I rather like how the back turned out with the crinkles from the clingfilm :DIt could quite easily be made in to a reversible piece by adding detail to the back (which I have just thought of now by the way LOL ).

While the clay was still unbaked I cut it in to the shape, made my hanging holes, then pressed my butterfly stamp in to it.

I baked it according to the manufacturers instructions and left it to cool.

Once cooled I added alcohol inks, I started with greens and blues all over but didn't feel the text stood out enough, so I covered it in black soot.
I then removed the excess by wiping over the surface with a paper towel with a little bit of blending solution on leaving behind the ink in the stamped image.
I added a little bit of perfect pearls to the butterfly.
When everything was dry I coated it with layers of Lisa Pavelka resin.

I tried a couple of other pieces some succesful, others not.
This is the same blue as my main piece but I added beadazzles to it...
This piece didn't work so well as I added the resin just to the indented area first and it puddled the alcohol ink ...And these little birds turned out rather nicely.
The one on the left is just the perfect pearls, the one on the right is swiped over with black ink.

The great thing about this technique is that you only need to buy white clay and colour it any colour with your mica powders.

Whats your something new going to be this month?
Upload it to the launch post on the Happy Daze blog to be in with a chance of winning this months prize :D

Hugs'n'snogs,
Julie xx

Edited to add - everybody seems to love that little bird mould so HERE is a link for it. Its only a little mould though probably about 2cm max accross the widest point

Sunday, 4 December 2011

Time for Tea??

I have just uploaded this really cute Alice themed ear wire in to my Folksy shop HERE

So if you fancy something a little bit different for that special Alice fan in your life why not stop by and get them a treat :D

I have lots of other pretty ear wires in my shop and have just listed some beaded ones without earrings which including postage are only £10!!!

Dare to be different?
Go on, you know you want too :D

hugs'n'snogs,
Julie xx

Saturday, 3 December 2011

Naughty or nice???

The challenge this month over at Happy Daze blog is all to do with Christmas. Anything you have made to give as a gift, to wrap your gift in or label your gift.
This will also tie in very nicely with Tim's 12 days of christmas tags, so if you are planning to follow Tim and do the tags this year do check out the shop for many of the must have items you will need. If you do take part in his tag challenge please share them will us by uploading via the linky at the bottom of the POST.

I made a really sweet Nughty or Nice Santa Pin made using Lisa Pavelka Resin Pink Paislee Father Christmas around the world Paper a gold bail like this one corked Vials Christmas muse tokens platinum stickles
I covered the domino in the Around the world paper, add stickles to the edges then covered it in the Lisa Pavelka resin, set for 10 minutes in your UV lamp box, add the bail to the back and there it is a lovely altered domino ready for hanging. Add various beads to a length of chain using jump rings and attach the muse token to the bottom. In the little corked vial add your naughty and nice list and hang this from a length of beaded chain. Hang them along the pin in the order shown, or mix them around it's up to you. A fab pin to brighten up your christmas.

Don't forget to hop on over to the HAPPY DAZE blog to check out the other DT's fabby creations to inspire your Christmas crafting :D

Are you taking part in Tims 12 tags of Christmas?? I had planned to, but haven't even got one done yet!!! :-O

Don't forget to visit the SHOP for all your essentials :D

Hugs'n'snogs,
Julie xx

Edited to add - this is now on sale in my Folksy shop HERE if anybody is interested :D

Saturday, 22 October 2011

Christmas is coming!!!!


It's definitely sneaking up on us now isn't it??
If you are thinking about your Chrimbo prezzies now please come and check out my jewellery for sale at my Folksy shop Vintage Me :D

Or visit me on FACEBOOK to keep up to date with whats new

Hugs'n'snogs,
Julie xx

Friday, 21 October 2011

Death bangle for Happy Daze


Can't find the perfect jewellery to go with your halloween costume? or do you want something just a little bit different to everybody else's??

Then pick up some of these amazing wooden bangles from Moira at just £3.55 for a set of three!!! :D

They have a lovely smooth surface so are very easy to colour.
I coloured mine by rubbing on Viva decor inka gold and polishing it up.

I then stamped white tissue paper with images from these fabby Pink Paislee Phantom stamps .

I glued them on with Claudine Hellmuth matte medium being careful not to get any on the front of the image as I wanted to tint the images with distress Spiced Marmalade ink pad.

I lightly spritzed patches of the bangle with Cosmic shimmer mist - just a little warning though, the pigment is very strong in these and stains very easily.....I have very purple hands right now!!!

I glued on some little patches of grey lace with the matte medium then when dry smeared on some distress stickles in Spiced Marmalade and Chipped Sapphire.

When everything was dry I sponged on more matte medium to seal everything in place.

You could make bangles to match all your outfits with these very affordable bangles :D
Now for some close ups....


Hugs'n'spooky snogs,
Julie xx

Friday, 7 October 2011

Hocus Pocus earwire for HappyDaze


hi everyone, this week I am sharing a cute little piece of jewellery for Halloween or just for anybody with a secret dark side ;-)

It features the brand spanking new Pink Paislee Phantom clear stamps :D

They are super cool and not strictly for Halloween with the cute little cameos and bird cage.
I stamped them on to shrink plastic using a black promarker as I found archival ink too wet, particularly with clear stamps.

I added lots of beads, chains and a cute little vial coloured with red alcohol ink.

These are my latest addiction and if you want to know more about how to create your own visit Amelia Lunes Etsy shop HERE to purchase a tutorial.

Here's a few more pics for you with a little bit more detail :D

Hugs'n'snogs,
Julie xx

Sunday, 18 September 2011

Been a little bit busy....

....due to a reclassification of "handmade" on Folksy!!

Quite a few of the items are now not deemed to be handmade so rather than deleting the items and losing my fees I have made some new bits and pieces and altered the listings.

I have moved the "naughty" items over to a new shop HERE on DaWanda to give that a try if anybody would like to pay me a visit :D

And just in case you don't want to visit there but are on facebook I have a new page HERE, so please come and "like" me :D

Wanna see what I have been up to???
here ya go :D


Hugs'n'snogs,
Julie xx

Friday, 2 September 2011


I have just finished this necklace and listed it on Folksy HERE - if you are interested don't dally because I might change my mind and keep it LOL :D

Hugs'n'snogs.
Julie xx

Edited to add OMG its sold already!!!


Sunday, 28 August 2011

well I tried!!!!


I spent Saturday at a local craft fair trying to sell my jewellery and a few altered items, it didn't go that well LOL
I just made the price of my table with 50p to spare!!!
But how cute does my table look - even with a wonky table cloth!!!
Well I don't plan on being beaten as I did have a lot of interest in my items so have started listing my pieces in my folksy shop HERE :D

So stop by and treat yourself or let your pals know where I am :D

Hugs'n'snogs,
Julie xx

Saturday, 20 August 2011

Pretty Lucite rings


I have been getting ready for a craft show I will be having a stall at next weekend and found some fabby little sieve rings in my local craft shop.
I already had the flower beads so thought why not put the two together :D
I love them so much though I'm not sure I can part with them LOL :D

I also made some cute little scrabble tile rings - you could defo have some fun with these :D - my niece suggested LOVE - HATE LOL :D


Hugs'n'snogs,
Julie xx

P.S. I have added some to my folksy shop HERE